Gadget Wisdom

Author: Captain

Registration time

2011-12-27 06:16:51

Email

generic@weneca.com

All posts by Captain

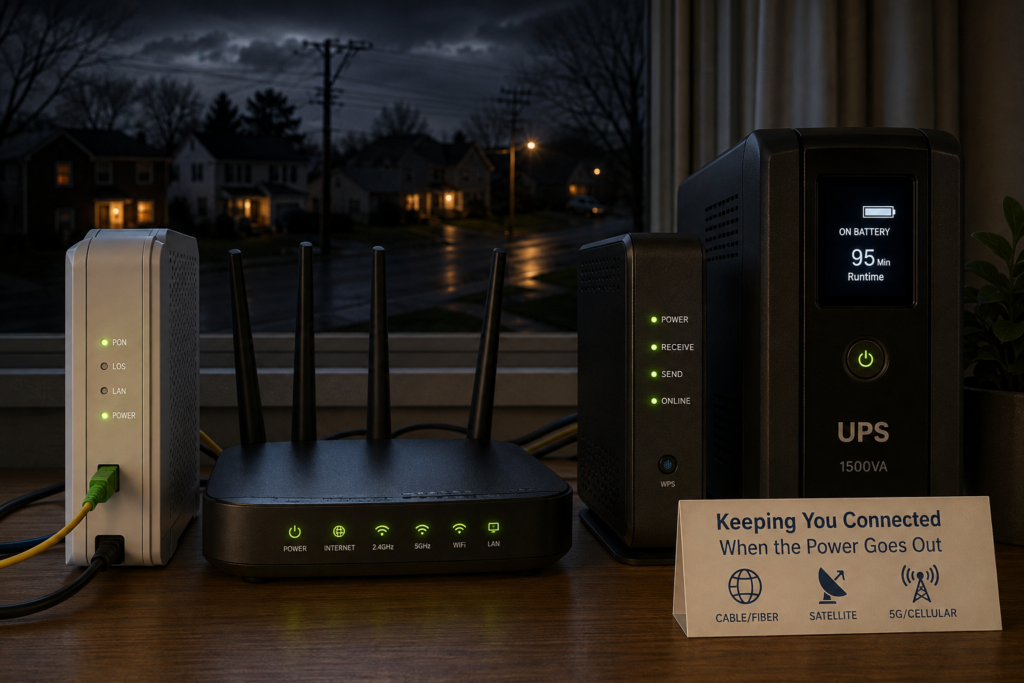
UPS battery backup powering a modem and Wi-Fi router during a power outage
0 Responses

Best UPS Battery Backup for Routers and Modems (Keep Your Internet Running During Power Outages)

If your internet connection disappears the moment the power flickers, the problem usually isn’t your internet provider.

It’s your power.

Most home networks rely on several small devices that all require electricity: a modem, a router, sometimes Wi-Fi access points, switches, or security cameras. When power fails, every one of those devices shuts off instantly.

A UPS (Uninterruptible Power Supply) solves this problem by providing instant battery backup. When electricity fails, the UPS switches to battery power automatically and keeps your networking equipment running.

Because routers and modems draw very little power, even a modest UPS can often keep your internet working for an hour or more.

Best UPS Battery Backup for Routers and Modems

If your goal is keeping your internet connection alive during a power outage, these UPS models provide reliable backup power and strong electrical protection.

UPS Model Best For Capacity Check Price
CyberPower CP1000PFCLCD Best overall UPS 1000VA / 600W Check price
APC BR1500MS2 Larger home networks 1500VA / 900W Check price
CyberPower EC650LCD Best budget UPS 650VA / 390W Check price
APC BE600M1 Small setups 600VA / 330W Check price
Eaton 5S700LCD Premium reliability 700VA / 420W Check price

Can a UPS Keep Wi-Fi Working During a Power Outage?

Yes. A properly sized UPS can keep your modem, router, Wi-Fi access point, and small network switch running during short power outages. The runtime depends on the size of the battery backup and how much equipment is plugged into it.

For many home setups, the goal is not to run the entire house. It is to keep the internet connection alive long enough for brief outages, remote work, smart-home devices, security cameras, and alerts to keep functioning.

If your internet provider’s equipment outside the home still has power, a UPS can often keep your home network online. If the neighborhood equipment is also down, the UPS may keep your router running but not preserve the internet connection.

Why Routers and Modems Benefit From a UPS

Networking equipment consumes surprisingly little electricity.

Typical power usage looks like this:

  • Modem: 10–20 watts
  • Router: 10–25 watts
  • Wi-Fi access point: 10–20 watts
  • Small network switch: 5–20 watts

Because the power draw is low, UPS batteries can keep networking equipment running far longer than desktop computers or gaming systems.

A UPS also protects networking hardware from:

  • power outages
  • voltage drops
  • power surges
  • short power interruptions

If you work from home, rely on internet-connected security cameras, or have smart home devices that stop working when the network goes down, a UPS can make a bigger difference than you might expect.

Best Overall UPS for Routers and Modems: CyberPower CP1000PFCLCD

The CyberPower CP1000PFCLCD is one of the most popular UPS units for home networking setups, and for good reason. It hits a sweet spot between price, capacity, and features.

  • 1000VA / 600W capacity
  • pure sine wave output
  • Automatic Voltage Regulation (AVR)
  • LCD status display

This is more UPS than most people strictly need for a modem and router, but that is part of the appeal. The extra capacity can translate into longer runtime, and it leaves room to protect a switch, access point, or small NAS as well.

Check the latest price

Best UPS for Larger Home Networks: APC BR1500MS2

If your network includes multiple access points, switches, or other equipment, the APC BR1500MS2 provides additional runtime and capacity.

  • 1500VA / 900W capacity
  • 10 outlets
  • excellent voltage regulation
  • USB charging ports

This UPS works well for larger home networks, network closets, or equipment racks where you want more runtime and more room to plug in devices. It is probably overkill for a basic modem-and-router setup, but for more involved home networks it makes sense.

Check the latest price

Best Budget UPS for Routers and Modems: CyberPower EC650LCD

If you only need backup power for a modem and router, the CyberPower EC650LCD offers solid protection at an affordable price.

  • 650VA / 390W capacity
  • compact design
  • LCD battery display
  • energy-saving outlets

This is the kind of UPS that makes a lot of sense for someone who is tired of brief outages knocking out the internet and does not want to spend a fortune fixing the problem.

Check the latest price

Best Compact UPS for Small Setups: APC BE600M1

The APC BE600M1 is a small UPS designed for simple networking setups.

  • 600VA / 330W capacity
  • compact footprint
  • USB charging port
  • reliable APC design

If you only want to keep a modem and router running, this compact UPS can do the job without taking up much space. It is especially appealing if your equipment lives on a shelf, in a corner, or anywhere a larger UPS would be awkward.

Check the latest price

Best Premium UPS for Networking Equipment: Eaton 5S700LCD

The Eaton 5S700LCD is known for excellent build quality and strong electrical protection.

  • 700VA / 420W capacity
  • excellent surge protection
  • LCD display
  • durable internal components

If you want something a bit more robust than the usual consumer UPS options, Eaton is a respected name. This model is a good fit for buyers who care about electrical protection quality as much as runtime.

Check the latest price

How Long a UPS Can Keep Your Internet Running

UPS runtime depends on how much electricity your devices use.

Because routers and modems consume very little power, runtime can be surprisingly long:

  • small UPS: 30–60 minutes
  • mid-size UPS: 1–2 hours
  • larger UPS: several hours depending on load

If your ISP’s neighborhood equipment stays online during an outage, that can mean your internet keeps working long after the lights go out. Of course, if the provider’s own local infrastructure loses power, your UPS cannot fix that. But for many brief outages and localized electrical issues inside your home, it absolutely helps.

How Much UPS Capacity Do You Actually Need for a Router and Modem?

This is one of the biggest mistakes people make when shopping for a UPS. They assume they need a huge battery backup because that is what they would need for a gaming PC or home server.

For a modem and router, that usually is not true.

If your combined load is only 20 to 40 watts, even a modest UPS can provide meaningful runtime. The bigger units are useful if:

  • you want much longer runtime
  • you also want to power access points, switches, or cameras
  • you want extra overhead and flexibility

For a simple setup, the budget and compact models are often enough. For more complicated home networks, the larger units become easier to justify.

UPS Features That Matter for Networking Equipment

When choosing a UPS for routers and modems, these features matter most:

  • Automatic Voltage Regulation (AVR) to stabilize power fluctuations
  • pure sine wave output for sensitive electronics
  • surge protection for networking hardware
  • sufficient outlets for your modem, router, and other equipment

You do not necessarily need the most expensive UPS on the market, but you do want one that handles brownouts and voltage fluctuations gracefully. Those are often more common than full outages.

If you want to understand these features in more detail, see this guide to choosing a UPS with the right features.

When a UPS Makes the Biggest Difference for Home Internet

A UPS battery backup is especially useful if:

  • power flickers frequently
  • you work from home
  • your security cameras rely on internet connectivity
  • your smart home devices depend on cloud services
  • your modem takes several minutes to come back online after a power outage

Even brief outages can lead to several minutes of downtime while a modem and router reboot. A UPS prevents that interruption entirely and can make your home internet feel much more reliable.

Which UPS Is Best for Your Router and Modem?

If you want the best balance of price, features, and runtime, the CyberPower CP1000PFCLCD is the strongest overall choice for most people.

If you have a larger home network or want more runtime, the APC BR1500MS2 is a strong upgrade.

If you want a lower-cost solution, the CyberPower EC650LCD and APC BE600M1 are both sensible picks for simple setups.

And if you want a more premium UPS with a strong reputation for power protection, the Eaton 5S700LCD is worth a look.

For something as simple as keeping your router and modem online during a power outage, a UPS is one of the most practical upgrades you can make. Once you have one, it is hard to go back to watching your internet disappear every time the power blinks.

Published on March 29, 2026
Full Post
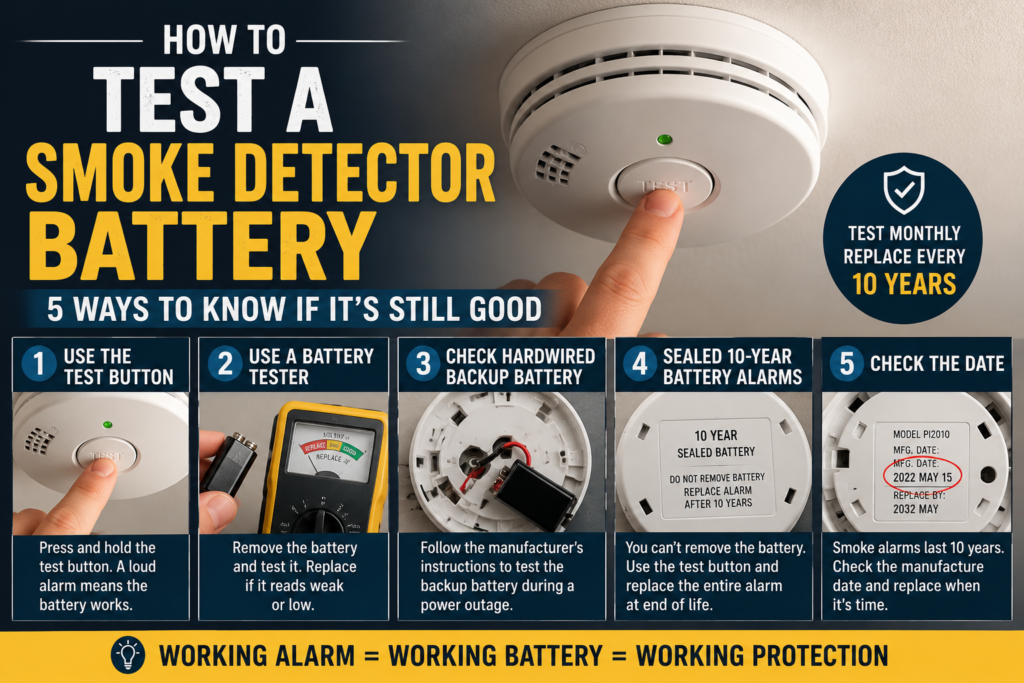
Smoke detector chirping at night due to sealed 10-year battery reaching end of life
0 Responses

Your Smoke Detector Won’t Stop Chirping? The Hidden 10-Year Battery Problem

You come home after being away for a few days and hear it immediately.

Chirp… chirp… chirp.

Your smoke detector won’t stop chirping.

Naturally, you assume the smoke detector battery needs to be replaced. You press reset, maybe flip the breaker, and expect the noise to stop.

Except it doesn’t.

That happened to me recently. I had been away for a while, came into the house, and heard the beeping. I tried hitting reset, but that did nothing. I removed the unit and realized it was hardwired. After some searching, I discovered the real issue: the detector had an integrated 10-year battery that could not be replaced. To make the sound stop, I had to physically disable the unit with a screwdriver and then replace the alarm entirely.

That experience sent me down a rabbit hole, and I suspect many homeowners are about to have the same one.

Quick Answer: Why a Smoke Detector Chirps Even After Replacing the Battery

If your smoke detector chirps even after resetting it or replacing the battery, the unit may have a sealed 10-year battery and the detector itself has reached the end of its lifespan. In that case the entire alarm must be replaced rather than the battery.

Why This Problem Is Suddenly Becoming Common

Many homeowners are encountering this issue for the first time because sealed 10-year smoke detectors became much more common roughly 10 to 15 years ago. In fact, some places, for example, New York, no longer allow the sale of ones with replaceable batteries.

These units were designed to solve a real safety problem. Traditional detectors used replaceable batteries, and some people removed the batteries to stop nuisance alarms and forgot to reinstall them. When it comes to hardwired smoke detectors, the battery serves as a backup if the power goes out.

Manufacturers responded by introducing alarms with sealed lithium batteries designed to last the life of the detector. The trade-off is that once the battery or sensor reaches the end of its lifespan, you cannot replace the battery. The entire smoke detector must be replaced.

If your detectors were installed in the early or mid-2010s, you may now be hearing their end-of-life warning chirp for the first time.

The Real Reason a Smoke Detector Keeps Chirping

Smoke detectors can chirp for several reasons, but one of the most confusing is the end-of-life warning used by many modern alarms.

Many detectors now:

  • use a sealed 10-year lithium battery
  • are hardwired but include a sealed backup battery
  • chirp every 30–60 seconds when the unit reaches end of life
  • must be replaced entirely once this happens

That is why pressing reset often does not fix the problem. The detector is not asking for a new battery. It is telling you the entire alarm has expired.

How to Tell If You Have a Sealed 10-Year Smoke Detector

Take the detector down and inspect it carefully. Signs you are dealing with a sealed battery alarm include:

  • no removable battery compartment
  • “10-year sealed battery” printed on the back
  • a installation date close to or more than 10 years old. Smoke detectors include a place to write this on the device. You can also set a calendar reminder or keep a spreadsheet if you are the sort to do so.
  • instructions referencing permanent battery deactivation

If you forgot or it is unreadable, check the manufacture date. Most smoke detectors have a manufacture date printed on the back. If the unit is around 10 years old, it should be replaced even if it appears to work normally.

Why Resetting the Detector Often Does Nothing

When homeowners hear chirping, they usually try the obvious fixes:

  • pressing the reset button
  • cutting power at the breaker
  • looking for a battery compartment
  • disconnecting and reconnecting the alarm

These steps make sense, but they cannot revive a sealed-battery detector that has reached the end of its service life. The chirp is a built-in warning that the unit itself needs to be replaced.

How I Finally Stopped the Chirping

In my case, the alarm was hardwired, which made things more confusing. I assumed there had to be a replaceable backup battery somewhere.

There was not.

What finally worked was removing the detector and finding the battery disable mechanism. Many sealed alarms include a small tab or switch that permanently disconnects the internal battery when the unit is removed for disposal. Using a screwdriver to activate that mechanism stopped the chirping.

Of course, that also meant the alarm was finished and needed to be replaced.

How to Stop a Chirping Smoke Detector for Good

If the detector has reached end of life, the permanent solution is replacement.

The process usually looks like this:

  1. Remove the detector from its mounting plate.
  2. Check the manufacture date on the back.
  3. Confirm whether it uses a sealed battery.
  4. Disable the old alarm if it continues chirping after removal.
  5. Install a new compatible smoke detector.

If several alarms were installed at the same time, it may be worth checking the age of the others in your home as well.

Choosing a Replacement Smoke Detector

If you are replacing an expired alarm anyway, it may be worth upgrading to a newer model.

Depending on your setup, you may want:

  • a sealed 10-year battery smoke detector
  • a detector that complies with the latest standards. recommendations and technology improves every few years
  • a hardwired alarm with battery backup
  • a combination smoke and carbon monoxide detector
  • a smart smoke detector that sends phone alerts

If you want to explore modern options, I have previously covered smart smoke detectors and compared several models in my guide to the best smoke and carbon monoxide detectors.

Why Smoke Detector Chirping Often Starts at Night

Many people notice the chirping begins overnight or in the early morning. That is not a coincidence.

Lower nighttime temperatures can slightly reduce battery voltage. When a battery is already weak or nearing end of life, that drop can trigger the alarm’s warning system. The detector may have been close to failure already, and cooler overnight conditions push it over the threshold.

Unfortunately, that means these alarms tend to start chirping at the most annoying possible time.

When a Chirping Smoke Detector Means It’s Time to Replace the Alarm

If your smoke detector chirps even after resetting it or replacing the battery, the detector itself may have reached the end of its lifespan.

Many smoke alarms installed over the last 10 to 15 years contain sealed batteries designed to last the life of the detector. Once that life ends, the only real solution is replacing the entire alarm.

If your unit is about a decade old, the chirping is usually not a glitch. It is the detector telling you it is done.

Published on March 26, 2026
Full Post
Digital camera for kids no smartphone no cell phone
0 Responses

Why This Digital Camera Might Be the Best Gift for Kids in the Age of Phone Bans


Across the U.S., schools are starting to push back against student smartphone use — and parents are listening. Sparked in part by the debate following Jonathan Haidt’s bestselling book The Anxious Generation, a growing number of districts are restricting or outright banning phones during the school day.

But that leaves parents asking a question: what can we give kids instead?

There’s one surprisingly perfect answer — the return of the digital camera.


The Case Against Phones for Kids

Haidt’s The Anxious Generation argues that the rise of constant digital stimulation, social media, and smartphone dependency is directly tied to anxiety, depression, and loneliness in young people.

Many educators agree. Schools from California to New York have implemented “Yondr” pouches or mandatory lockers for phones. The movement isn’t about anti-technology — it’s about reclaiming attention, creativity, and real-world connection.

That’s where devices with a single purpose come in — tools that help kids engage with the world rather than scroll through it.


Rediscovering Real Photography

Before the smartphone, photography was its own kind of adventure. You picked a subject, framed a shot, and waited to see what you captured. Today, a dedicated camera — especially one designed for kids — brings that magic back.

One of the best new options for that purpose is the Digital Camera for Kids (link), a compact, fun, and durable model that’s built to spark curiosity without distraction.

It’s small enough for a backpack, rugged enough to survive a fall, and best of all — it doesn’t come with notifications, games, or the endless scroll of social media.


Why a Digital Camera Makes a Great Phone Alternative

Parents are looking for screen-free or low-screen ways to give kids creative freedom. A kids’ digital camera checks every box:

? Encourages Creativity

Instead of selfies and filters, kids can focus on composition, light, and storytelling. You might be surprised how creative they become when they’re not chasing likes.

? Builds Focus and Patience

Taking photos intentionally — instead of just snapping endlessly — helps kids slow down and see their surroundings differently.

? Promotes Outdoor Play

When children have a camera, they naturally go outside more. Whether it’s birds, pets, or clouds, they start looking for subjects instead of screens.

? No Distractions

There’s no social feed, no messages, no pings. Just a device for capturing moments — the way photography was meant to be.

? Teaches Responsibility

Owning their own camera (especially one that’s sturdy and simple) helps kids take care of their gear and understand the value of technology as a tool.


Spotlight: A Great Starter Camera for Kids

The Digital Camera for Kids available on Amazon is one of the best-reviewed options for parents looking for a child-friendly photography device.

It’s designed for ages 6–12 and includes:

  • Full HD video and photos (so they can make short movies, too!)
  • Shockproof housing and ergonomic grips
  • Rechargeable battery via USB-C
  • Expandable storage with microSD cards
  • Simple, intuitive menus for beginners

Parents love that it’s durable, inexpensive, and fun — without being another gateway to social media.

If your child loves to explore, this camera turns curiosity into creativity.

? View it now on Amazon ?


The Bigger Conversation: Raising the “Unplugged Generation”

Jonathan Haidt’s The Anxious Generation has reignited a much-needed conversation about how digital life is shaping childhood. He argues that social media and constant phone use have rewired adolescence, trading independence and real-world exploration for isolation and comparison.

You don’t have to agree with every argument in the book to recognize the problem. Even adults admit they struggle to set boundaries with their devices.

By giving kids tools that focus their attention outward, like a camera, microscope, sketchbook, or instrument, we help them build independence — without handing over a gateway to the entire internet.

? The Anxious Generation on Amazon ?


What Schools Are Doing — and What Parents Can Do Too

More than a dozen school districts have enacted phone-free school days, and early results are encouraging:

  • Students report better focus in class
  • Teachers see improved behavior
  • Social interactions are more positive and in-person

At home, parents can build on that progress. Creating “phone-free” times and spaces — like dinner, homework, or weekends outdoors — helps reinforce that balance.

Replacing the phone with something purposeful, like a digital camera, ensures that creativity isn’t lost when screens are put away.


Building Better Digital Habits Starts Early

Going phone-free doesn’t have to mean going tech-free. It means teaching kids that technology should serve creativity, not consume it.

A simple, single-purpose device like the Digital Camera for Kids gives them freedom to explore and express themselves — without the noise of the online world.

Pair it with a copy of The Anxious Generation for yourself or another parent, and you’ll see why this conversation is so important.

Let’s make curiosity cool again.


Published on October 26, 2025
Full Post
0 Responses

Can DIY Solar Panels Eclipse My High Energy Bills?


The Solar Panels Experiment: My Journey Toward Energy Self-Sufficiency

DIY Modular Solar

I’ve always been a tech optimist. If there’s a gadget or piece of infrastructure that promises to make life more efficient, more automated, or more independent, I want to understand it—and if it works, adopt it. That mindset is what originally led me to install sensors throughout my vacation property, experiment with remote home monitoring, and try out new smart home technologies as they’ve emerged. It’s also what led me to install heat pumps at the house.

But this year, optimism turned into skepticism.

When Promises Meet Reality: My Heat Pump Debacle

Like many homeowners looking for a greener, more modern solution to heating and cooling, I was lured by the promise of heat pumps. No more oil or propane deliveries. Whisper-quiet operation. Environmentally friendlier systems. Substantial government and utility rebates. It all sounded like a win-win. And for a while, it was.

Then the winter utility bills started rolling in.

And they kept rolling in.

What had once been a manageable heating bill tripled, year over year. And the culprit, according to my utility provider? “Usage.” Allegedly, I had used nearly three times the energy I had the previous winter, despite no notable changes to my use of the property or the weather.

I chalked it up to a few possibilities—yes, heat pumps use electricity rather than combustion fuels, and in very cold climates, they can struggle to operate efficiently. But the scale of the increase was baffling. It didn’t align with reality. And then I remembered something else: around the same time the heat pumps went in, my utility provider installed smart meters.

Smart Meter, Dumb Results?

Now, I want to be clear—I’m not a conspiracy theorist. I don’t think there’s a cabal of utility engineers huddled around a dial cranking up my bill to fund their quarterly bonuses. But I am a technologist, and I know that technology—particularly rushed, wide-scale deployments—can be flawed. Especially when there’s no customer-side auditability.

There’s something uniquely frustrating about seeing a bill that’s three times higher than it used to be, accompanied by usage data you have no way to independently verify. The old meters spun. You could watch them. Smart meters? They hum silently in the background, collecting data and sending it off somewhere. You have to trust that they’re correct.

I don’t.

And that brings me to the reason for this article—and for what I hope will be an occasional series here on GadgetWisdom: my exploration into solar.

The DIY Solar Panels Experiment Begins

Let me be clear: I am not making a massive investment in solar overnight. This isn’t a sponsored, all-in, “I just installed a 20kW Tesla roof and Powerwall system” kind of post. This is a cautious experiment. It’s a project. And like many of you reading this, it starts with a desire to understand—really understand—how something works, and what kind of value it can provide.

My goals are as follows:

  1. Buy and install a small solar setup: I want to start with a small number of panels and a basic grid-tied inverter system. Nothing fancy. No batteries (yet). Just enough to monitor output, offset a bit of consumption, and see how it integrates with my existing power setup.
  2. Ensure expandability: Any system I install now must be modular. That means using microinverters or a hybrid inverter setup that allows me to add more panels in the future without ripping everything out. It also means laying the groundwork—electrically and logistically—for future energy storage.
  3. Monitor performance obsessively: I want to track production vs. usage as granularly as possible. This means smart monitoring systems, independent usage logging, and some good old data nerding.
  4. Build toward self-sufficiency: Over time, the goal is to generate enough power to offset a significant portion of my usage—especially in winter. That might mean batteries, backup systems, or even some creative load management.
  5. Document the process for others: Solar is full of hype and half-truths, and I want to provide something a little more grounded. Real-world data. Real-world frustrations. Real-world results.

The Challenges Ahead

Going solar sounds simple in the abstract: slap some panels on your roof, plug them in, and start saving. But in practice, it’s more complicated. Some of the challenges I’m already anticipating:

  • Shading: My property is surrounded by trees. Not directly overhead, but enough that seasonal shading may affect panel output. I’ll need to map this out carefully and possibly look at ground mounts or pole mounts.
  • Installer cooperation: Many solar installers aren’t thrilled about small, modular installs. They want to do big 10kW+ systems, not 1kW proof-of-concept setups. They also make their money from financing and tax credits, making pricing as opaque as possible. So my plan is to use my trusted roofer and electrician to do the work.
  • Utility cooperation: Getting a grid-tied system approved and interconnected with my local utility can be a bureaucratic maze. Add to that my lingering skepticism of their smart meter data, and you can imagine how thrilled I am to begin that process.
  • Rebates and tax credits: There are local and federal incentives for solar, but they vary wildly and can change year to year. I’ll need to track them closely to make sure I maximize returns without getting buried in paperwork. Many of these may be going away next year thanks to President Trump’s Big Beautiful Bill
  • Batteries… eventually: Energy storage is expensive and complex. But it’s the key to resilience and off-grid capability. That will be a future phase of the project—probably next year if this first stage goes well.

Why Start Small?

Some people go big on solar because they’ve run the numbers and are convinced of the return. I’m starting small for the opposite reason: I don’t trust the numbers I’m seeing, either from installers or from my utility. I want to build my own dataset, see how panels perform in my exact conditions, and make decisions based on real data.

Plus, the tech changes fast. Inverters get smarter, panels get more efficient, and storage options evolve. By starting small, I give myself the flexibility to adopt the best solutions over time instead of locking into something big—and potentially obsolete—right now.

What You Can Expect

In future articles, I’ll be covering:

  • My research process for selecting panels and inverters
  • Tools and apps for tracking solar production
  • Permitting and interconnection headaches (hopefully not too many)
  • Installation decisions: roof vs. ground, angle, orientation
  • Performance analysis: how much power am I really generating?
  • Integration with my existing smart home and monitoring setups
  • First steps toward energy storage and load shifting
  • And eventually—what it all costs, what it saves, and whether I’d do it again

This won’t be a rapid journey. I’ll be documenting things as they happen—warts and all. If you’re a fellow DIY enthusiast, off-grid dreamer, or just someone who’s tired of paying power bills you don’t trust, I hope you’ll follow along.

Why This Matters

For me, this isn’t just about saving money (although I’d like to). It’s about taking control. It’s about not being at the mercy of a utility company whose math doesn’t add up. It’s about learning how to be more self-sufficient. And yes, it’s about the joy of tinkering—of building a system, testing it, improving it.

GadgetWisdom has always been about that impulse: to explore, to question, and to build. This solar journey is a natural extension of that spirit.

So let’s get started. Next up: choosing my first panels and inverter.

Stay tuned.

Published on August 18, 2025
Full Post
0 Responses

Vacation Home Temperature Monitoring: Remote Sensors for Peace of Mind

Vacation Home Temperature Monitoring

Owning a vacation home or a second home is a wonderful luxury, but managing your home when you are far away comes with its own set of challenges—especially when it comes to maintaining proper environmental conditions. This is where the X-Sense Wi-Fi Hygrometer Thermometer(Model STH54) becomes an invaluable tool.

Quick Answer: How Do You Monitor a Vacation Home Temperature Remotely?

The easiest way to monitor a vacation home temperature remotely is to use a Wi-Fi temperature and humidity sensor with phone alerts. Place sensors near plumbing, basements, wine storage, utility rooms, or other areas where freezing, overheating, or humidity problems could cause damage while you are away.

Monitoring Area Why It Matters What To Watch
Near plumbing Freezing pipes can burst and cause major water damage Low-temperature alerts near vulnerable pipes
Basement or crawlspace Humidity and temperature swings can signal trouble Humidity spikes, freezing risk, damp conditions
Wine cellar Wine is sensitive to heat and humidity changes Temperature and humidity range alerts
Utility room Heating or HVAC problems may show up here first Unexpected temperature drops or overheating
Main living area Confirms the home is staying within a safe range General temperature and humidity trends

With its ability to monitor both temperature and humidity, this smart device allows you to keep an eye on your property remotely, offering peace of mind and helping you avoid costly issues. Here’s how I use this vacation home temperature monitoring solution to protect my distant home.

Monitoring a Wine Cellar From Away

One of the first places I installed the X-Sense Wi-Fi Hygrometer was in my wine cellar. Proper storage conditions are critical for preserving the quality of wine, and even slight fluctuations in temperature or humidity can have a significant impact.

Using the hygrometer, I’m able to track real-time temperature and humidity levels from my phone, no matter where I am. The app’s customizable alarms notify me immediately if conditions deviate from my set parameters, ensuring my wine is always stored in ideal conditions.

Watching for Freezing Pipes Before They Burst

Another strategic placement for the sensor was near plumbing. In colder climates, pipes are at risk of freezing and bursting when temperatures drop too low, and when gone for months there is no need to keep the house fully heated. Even though I drain my pipes and turn off the main, I want to be sure that these areas of the house don’t drop too low. By positioning the X-Sense hygrometer near vulnerable areas, I can monitor temperatures remotely and receive alerts if they approach freezing. This gives me time to act, whether it’s adjusting the home’s heating system(also remotely) or contacting someone nearby to check on the property.

Setting Up Wi-Fi Temperature Sensors

Setting up the X-Sense Wi-Fi Hygrometer was surprisingly simple. After unboxing the device, I downloaded the companion app and connected the base station to my home’s Wi-Fi network.  Then I was able to pair each of the three sensors with the base station and place them. Within minutes, I was able to view data, set alarm thresholds, and start monitoring my property. The intuitive app makes it easy to adjust settings and view historical data, providing a comprehensive view of environmental conditions over time.

Why Remote Temperature Alerts Matter

With the X-Sense Wi-Fi Hygrometer, being far away from my second home has become significantly less stressful.
Knowing that I’ll be notified of any potential issues gives me peace of mind, whether I’m hundreds of miles away or just down the road. It’s a small investment that has already paid off by helping me maintain optimal conditions for my property and prevent potential disasters.

If you’re looking for a reliable, easy-to-use solution to monitor temperature and humidity at your vacation home, the X-Sense Wi-Fi Hygrometer is a tool worth considering. I have found it to be an indispensable tool for vacation home temperature monitoring.

If you are building a broader monitoring setup, you may also want to read my guide to securing a vacation home with remote monitoring.

Published on January 16, 2025
Full Post
0 Responses

The Impact of Higher Interest Rates on Solar Panel ROI

As the global push for renewable energy intensifies, solar panels have become a popular choice for homeowners and businesses looking to reduce their carbon footprint and energy costs. However, the economic landscape is ever-changing, and one significant factor currently reshaping the solar market is the rise in interest rates. In this article, we will explore how higher interest rates are affecting the value proposition of solar panels and what it means for potential buyers.

The Financial Dynamics of Solar Investment

Investing in solar panels typically involves a substantial upfront cost, which many consumers finance through loans or leasing options. The total cost of these financing methods is heavily influenced by prevailing interest rates. When interest rates are low, borrowing is cheaper, making the transition to solar energy more financially attractive. Conversely, higher interest rates increase the cost of borrowing, which can dampen the financial appeal of solar investments.

Increased Borrowing Costs

Higher interest rates directly impact the monthly payments on loans used to finance solar panel installations. For example, a homeowner taking out a $20,000 loan for solar panels at a 3% interest rate would pay approximately $360 per month over five years. If the interest rate rises to 5%, the monthly payment jumps to about $377. This increase might seem modest, but over the life of the loan, it adds significant cost.

For many consumers, the primary motivation for installing solar panels is the potential for long-term savings on electricity bills. However, the increased monthly payments due to higher interest rates can offset these savings, making solar less attractive from a purely financial standpoint.

Impact on Solar Leasing and Power Purchase Agreements (PPAs)

Not all solar panel installations are financed through loans. Many consumers opt for solar leases or power purchase agreements (PPAs), where a third party owns the panels and the consumer pays a monthly fee. These agreements are also affected by interest rates. Companies that offer leases or PPAs often finance their operations through debt. As their borrowing costs rise, they may pass these costs onto consumers in the form of higher monthly fees, thus reducing the overall savings from going solar.

Potential Mitigation Strategies

Despite the challenges posed by higher interest rates, there are strategies to mitigate their impact:

  1. Shopping Around for Financing: Consumers should compare different financing options to find the best terms. Some lenders may offer lower rates or more favorable terms that can help offset the increased costs.

  2. Government Incentives: Federal, state, and local incentives can still make solar a viable investment. Tax credits, rebates, and other incentives can significantly reduce the net cost of installation.

  3. Energy Efficiency Improvements: Combining solar panel installation with energy efficiency upgrades can enhance overall savings. Reducing energy consumption lowers the amount of electricity needed from the grid, maximizing the value of the solar investment.

The Long-Term Outlook

While higher interest rates present a challenge, the long-term value proposition of solar energy remains strong. Solar panels offer protection against rising electricity prices and provide environmental benefits. Moreover, technological advancements continue to improve the efficiency and affordability of solar panels, which can help counterbalance the impact of higher financing costs.

In conclusion, while higher interest rates do affect the immediate financial appeal of solar panels and reduce the return on investment(ROI), they do not diminish the long-term benefits and value of solar energy. By carefully considering financing options and taking advantage of available incentives, consumers can still make a wise investment in solar power.

By understanding the evolving financial landscape and staying informed, you can make the best decisions for your energy needs and contribute to a sustainable future.

Published on May 23, 2024
Full Post
0 Responses

Should I Install Solar Panels on a Rental Property? A Guide for Landlords and Tenants


Investing in solar panels is a popular way to reduce energy costs and embrace renewable energy. But when it comes to rental properties, both landlords and tenants have unique considerations. Can solar panels benefit both parties? How do they impact costs and energy savings? And can landlords charge tenants for solar power?

In this guide, we’ll explore the ins and outs of installing solar panels on rental properties and answer key questions based on the top searches about this topic.


The Benefits of Solar Panels for Rental Properties

Solar panels offer multiple advantages for rental properties, making them an appealing option for landlords and tenants alike:

For Landlords

  1. Increase Property Value: Solar panels can enhance the resale value of your property, as eco-friendly features are increasingly sought after.
  2. Attract Eco-Conscious Tenants: Tenants interested in renewable energy may prioritize properties with solar panels.
  3. Reduce Maintenance Costs: Solar systems are durable and require little maintenance, offering a long-term energy solution.

For Tenants

  1. Lower Utility Bills: Solar energy can significantly reduce monthly electricity costs, a major draw for renters.
  2. Environmentally Friendly Living: Renters can enjoy a greener lifestyle without the upfront costs of installing solar panels themselves.
  3. Energy Independence: In areas with frequent power outages, solar systems paired with battery storage can ensure a more reliable energy source.

Common Concerns: Do Tenants Benefit from Solar Panels?

Yes, tenants do benefit from solar panels in several ways. If the landlord provides electricity from the solar system at a lower rate than the local utility, tenants can save money. However, the exact savings depend on factors like energy usage and local solar policies.

Landlords can structure agreements to share the benefits, such as offering reduced rent in exchange for covering a portion of the solar system costs.


Key Considerations for Landlords Installing Solar Panels

If you’re a landlord thinking about installing solar panels on your rental property, keep these factors in mind:

1. Upfront Costs and Incentives

  • Solar panels require an initial investment, but tax credits and incentives can reduce the cost. For example, the federal Investment Tax Credit (ITC) offers significant savings.

2. Can I Charge Tenants for Solar Power?

Yes, landlords can charge tenants for solar power. This is typically done through a solar lease agreement or by including energy costs in the rent. Make sure to:

  • Clearly outline terms in the lease agreement.
  • Ensure that charges comply with local regulations, which may vary by state or municipality.

3. Net Metering Policies

Net metering allows surplus solar energy to be sent back to the grid, providing credits on electricity bills. These savings can either reduce the landlord’s costs or be passed on to tenants.


Challenges of Solar Panels for Rental Properties

While there are many benefits, landlords should be aware of potential challenges:

  • Long Payback Period: It may take several years to recoup the investment, depending on energy usage and savings.
  • Tenant Turnover: If tenants leave, landlords may have to renegotiate new agreements with incoming renters.
  • Complex Billing: Managing energy billing and sharing costs fairly can be tricky without clear agreements.

FAQs About Solar Panels for Rental Properties

1. Can I Install Solar Panels on a Rental Property?

Yes, landlords can install solar panels on rental properties. Just ensure you have the proper permits and comply with local laws.

2. Can I Charge Tenants for Solar Power?

Yes, you can charge tenants for the energy generated by solar panels, often at a lower rate than traditional utilities. Ensure transparency in your lease agreement.

3. Do Tenants Benefit from Solar Panels?

Tenants can save money on electricity and enjoy renewable energy benefits without the upfront costs of installation.

4. Is Solar Power for Rental Properties Worth It?

It depends on your goals. Solar panels are a long-term investment that can increase property value and attract tenants, but they require upfront costs.


Final Thoughts: Is Solar Right for Your Rental Property?

Solar panels can be a win-win for landlords and tenants. They offer energy savings, environmental benefits, and an attractive feature for rental properties. However, they also require careful planning, clear agreements, and upfront investment.

If you’re considering solar panels for your rental property, evaluate your budget, tenant needs, and local incentives. With the right approach, solar energy can be a smart addition to your investment portfolio.


Published on February 6, 2024
Full Post
0 Responses

In Massachusetts, An Overloaded Grid Stops The March Of Solar Energy

You’ve run the numbers on your new solar project. You expect a great ROI on your solar panels. But then, when you go to get the permits, you are told that the grid can only support an installation half the size of what you had scoped out, and, now, the numbers no longer make sense.  The Boston Globe recently reported that this is the reality for many in the state.

Massachusetts has long been a national leader in solar adoption, thanks in large part to an innovative incentive program that drove early developments. But now, it’s a different narrative: there’s very little room on the electric grid for new projects to connect.Hundreds of projects, totaling more than 400 megawatts, are being held up while the state and utilities determine how much additional electric infrastructure is needed and where, and who should pay for those upgrades.

Our antiquated grid is not set up to add capacity, not set up for reverse metering, not set up for even monitoring energy usage remotely.  This is quickly becoming a hindrance to the adoption of solar in Massachusetts and beyond.


Published on January 1, 2024
Full Post
Vacation home remote monitoring setup with leak sensors, temperature alerts, cameras, and smart home notifications
0 Responses

Vacation Home Remote Monitoring: Cameras, Sensors, and Alerts

A vacation home creates a very specific kind of anxiety: everything is probably fine, but you are not there to know.

A pipe can freeze. A water heater can leak. The internet can go down. A smoke alarm can scream into an empty room. A guest, cleaner, or contractor can forget to close a door. None of these problems has to be dramatic on day one. The expensive part is finding out too late.

That is where vacation home remote monitoring helps.

The goal is not to turn a second home into a surveillance bunker. The goal is simpler: know when something important changes while you are away, and have enough warning to do something about it.

Quick Answer: What Should You Monitor In a Vacation Home?

The most useful vacation-home monitoring setup usually includes water leak sensors, temperature and humidity sensors, smoke and carbon monoxide alert awareness, door or window sensors, a few carefully placed security cameras, and some way to know if the internet or power has gone out.

The best setup is boring in the right way. It sends alerts early enough that you can call a neighbor, property manager, plumber, electrician, HVAC company, or contractor before a small problem becomes expensive.

Risk Useful Sensor or Device Why It Matters
Freezing pipes Temperature sensor Warns you before plumbing areas get dangerously cold
Water leaks Leak sensor near water heater, sinks, toilets, HVAC, or basement Small leaks can become major damage when nobody is home
Humidity problems Humidity sensor Helps catch damp basements, musty rooms, or storage problems
Break-ins or open doors Door/window sensors and exterior cameras Shows whether someone entered or left something unsecured
Fire or carbon monoxide Smart smoke/CO detector or alarm listener Alerts you when nobody is there to hear the alarm
Power or internet outage Router monitoring, UPS, or connected smart devices Lets you know when the monitoring system itself may be offline

Start With The Problems That Cause Expensive Damage

It is tempting to start with cameras. Cameras are visible, satisfying, and easy to understand. You open an app and see the house. That feels like monitoring.

But the most expensive vacation-home problems are often not cinematic. They are boring.

A slow leak under a sink. A failed furnace during a cold snap. A basement humidity problem. A sump pump that stopped working. A refrigerator or freezer that lost power. A router that went offline, leaving every smart device silently useless.

So I would start with sensors that warn you about damage, not just cameras that show you what already happened.

Water Leak Sensors: The First Thing I Would Install

If I were building a vacation-home monitoring setup from scratch, water leak sensors would be near the top of the list.

Water has a special talent for turning a small failure into a big bill. A leaking water heater, toilet supply line, washing machine hose, refrigerator line, sump area, or HVAC drain can do real damage before anyone visits the house again.

Good places for leak sensors include:

  • under sinks
  • near toilets
  • next to the water heater
  • behind or near a washing machine
  • near HVAC equipment or condensate drains
  • in a basement or crawlspace
  • near a sump pump
  • near a refrigerator with a water line

A leak sensor does not fix the leak. It gives you time. That is the whole point.

If a sensor alerts you while you are away, you can call someone before the water has had a few days to explore the flooring, drywall, cabinets, and your patience.I previously shared some thoughts on my favorite leak sensors.

Temperature Monitoring: The Pipe-Freeze Warning System

Temperature monitoring is one of the most useful vacation-home tools because the problem is easy to understand: if the house gets too cold in the wrong place, pipes can freeze.

The important phrase is in the wrong place.

The thermostat may say the main living area is fine while a basement corner, crawlspace, garage wall, utility room, or pipe chase is much colder. If you only monitor the comfortable part of the house, you may miss the area that actually matters.

Useful places for temperature sensors include:

  • near vulnerable plumbing
  • in a basement
  • in a crawlspace
  • in a utility room
  • near an exterior wall with pipes
  • inside a garage or mechanical area
  • in a wine cellar or storage area

For a deeper look at this part of the setup, see my guide to vacation home temperature monitoring.

Humidity Sensors: Less Dramatic, Still Useful

Humidity is not as exciting as a burst pipe, which is exactly why it can be easy to ignore.

But a damp basement, musty storage area, or poorly ventilated room can cause slow problems: mold, odor, warped materials, damaged stored items, or a general sense that something is wrong every time you walk in.

A humidity sensor is useful because it gives you a trend, not just a panic alert. If humidity is creeping up over time, you may have a drainage issue, HVAC problem, dehumidifier failure, or ventilation problem.

This is especially useful in houses that sit empty for stretches. Nobody is walking in and thinking, “That smells a little off.” The sensor becomes the person who notices.

Smoke And Carbon Monoxide Alerts When Nobody Is Home

A traditional smoke alarm is designed for people inside the house. That is the problem with a vacation home. Nobody may be there to hear it.

There are a few ways to deal with this:

  • install smart smoke and carbon monoxide detectors
  • use an alarm listener that recognizes existing smoke/CO alarms
  • tie smoke/CO alerts into a monitored security system
  • use a broader smart-home setup that can notify you remotely

The right answer depends on how much infrastructure you already have. If you already use a security system, monitored smoke/CO may be part of that. If you are building a lighter DIY setup, smart detectors or alarm listeners may be easier.

The key is that someone gets the alert outside the house.

Please see our guide to smoke and carbon monoxide detectors.

Door And Window Sensors: Not Just For Break-Ins

Door and window sensors are usually sold as security devices, but for a vacation home they are also useful for boring operational mistakes.

Did a cleaner leave a door ajar? Did a contractor come and go? Is a window open before a storm? Did a guest forget to lock up? Did someone enter when nobody was expected?

These are not always dramatic security incidents. Sometimes they are just small mistakes that matter because the house is otherwise empty.

At minimum, I would consider sensors on:

  • main entry doors
  • garage entry doors
  • basement or utility entrances
  • sliding doors
  • windows that are easy to leave open or access

If you rent the property occasionally or have cleaners, guests, contractors, or family members using it, entry history can be useful even when nothing bad happens.

Security Cameras: Useful, But Do Not Overdo The Inside

Cameras are useful, but I would be careful about where they go.

For a vacation home, exterior cameras are usually the better starting point. They can show approaches, doors, driveways, garages, trash areas, utility access, and whether someone is on the property when they should not be.

Good camera locations may include:

  • front door or main entrance
  • driveway
  • garage or side entrance
  • back door or deck entrance
  • trash or utility area
  • walkway or obvious approach path

Indoor cameras are more complicated. They can be useful in a mechanical room, garage, basement, or unoccupied utility space. But in living areas, bedrooms, or rental situations, they can become intrusive very quickly.

The goal is awareness, not making the house feel creepy.

Power And Internet Monitoring: The System That Watches The Watchers

Remote monitoring depends on power and internet. That means you also need some way to know when the monitoring system itself has gone blind.

If every smart device goes offline at once, that may mean the internet is down. It may mean the power is out. It may mean the router crashed. Or it may mean the house is fine but your monitoring system is not.

Useful ways to monitor this include:

  • a router or network monitor that alerts when the connection drops
  • a UPS for the modem/router so brief outages do not take everything offline
  • smart plugs or devices that report offline status
  • a cellular backup option for more serious setups
  • a neighbor or property manager who can physically check if needed

This matters because a remote setup can create false confidence. You are not really monitoring the house if the system can go offline silently.

See out guide to the best UPS for your internet router to keep you online in a power outage.

A Practical Starter Setup For A Vacation Home

A good starter setup does not need to be complicated.

I would rather have a few well-placed sensors than a pile of gadgets nobody pays attention to.

  1. Put leak sensors where water damage starts. Start with the water heater, laundry area, sinks, toilets, HVAC equipment, sump pump, and basement trouble spots.
  2. Add temperature sensors near vulnerable plumbing. The living room temperature is useful, but the pipe area matters more.
  3. Add humidity sensors in basements or storage areas. This helps catch slow problems before they become musty expensive ones.
  4. Use exterior cameras instead of indoor overkill. Watch approaches, doors, driveway, garage, and utility areas.
  5. Add door sensors where mistakes happen. Main doors, garage doors, and sliding doors are usually the first places to monitor.
  6. Monitor internet or power indirectly. If everything disappears from the app, you need to know whether the house lost internet, power, or both.
  7. Have a response plan. Alerts are only useful if someone can act.

Vacation Home Monitoring Only Works If Someone Can Respond

This is the part that smart-home marketing tends to skip.

An alert is not a solution. It is a request for action.

If a leak sensor goes off, who can get inside? If the temperature drops near the pipes, who can check the heat? If the internet goes offline, how will you know whether it is a router problem or a power outage? If a camera shows someone at the door, who is supposed to do anything with that information?

Before adding more gadgets, make a short response list:

  • a neighbor with a key
  • a local property manager
  • a plumber
  • an HVAC company
  • an electrician
  • a cleaner or caretaker
  • a family member who can check the property

The best vacation-home monitoring setup is not the one with the most devices. It is the one that catches the problems you actually worry about and connects those alerts to someone who can do something.

What I Would Monitor First

If I had to prioritize, I would not start with the fanciest camera or the most elaborate smart-home dashboard.

I would start here:

  1. Water leaks, because water damage gets expensive fast.
  2. Temperature near vulnerable pipes, because freezing is predictable but still easy to miss from far away.
  3. Humidity in basements or storage areas, because slow problems are still problems.
  4. Smoke/CO alerting, because alarms are not very helpful if nobody hears them.
  5. Exterior cameras and door sensors, because they help confirm activity around the home.
  6. Power/internet status, because the rest of the system depends on it.

That is not the flashiest setup. It is the one most likely to save you from the problems that make second-home ownership stressful.

Related Guides

Frequently Asked Questions About Vacation Home Remote Monitoring

What is the best way to monitor a vacation home remotely?

The best way to monitor a vacation home remotely is to combine water leak sensors, temperature and humidity sensors, smoke/CO alerting, door sensors, exterior cameras, and a way to know whether power or internet has gone out.

Do I need cameras inside a vacation home?

Not necessarily. Exterior cameras are often more useful and less intrusive. Indoor cameras may make sense in a garage, basement, or mechanical room, but they can feel invasive in living spaces or rental areas.

How can I monitor a vacation home for freezing pipes?

Use temperature sensors near vulnerable plumbing, basements, crawlspaces, utility rooms, or exterior walls with pipes. Do not rely only on the main thermostat if the coldest area is somewhere else.

What sensors should I put in a second home first?

Start with water leak sensors, temperature sensors, humidity sensors, and smoke/CO alerting. Cameras and door sensors are useful, but water and temperature problems often cause the most expensive surprises.

What happens if the internet goes out at my vacation home?

If the internet goes out, many smart-home devices may stop reporting. That is why it helps to monitor router status, use a UPS for network equipment, or have a local person who can check the property if everything goes offline.

Published on December 27, 2023
Full Post
0 Responses

Key Strategies For Maximizing Your Solar Panel ROI

Solar energy is becoming increasingly popular as a renewable and cost-effective source of electricity. With the rising costs of traditional energy sources and the growing concern for the environment, more and more people are turning to solar panels to power their homes and businesses.

But investing in solar panels is a big decision, and it’s important to ensure that you get the most out of your investment. In this article, we’ll discuss key strategies for maximizing your solar panel ROI (return on investment) and how to use a solar panel ROI calculator to make informed decisions.

Why Is Solar Panel ROI Important?

Before we dive into strategies for maximizing your solar panel ROI, let’s first understand why it’s important.

Cost Savings

Solar panels on a rooftop

by Fer Troulik (https://unsplash.com/@fertroulik)

The primary reason for investing in solar panels is to save money on electricity bills. By generating your own electricity, you can reduce or even eliminate your reliance on traditional energy sources, which can save you thousands of dollars over the lifetime of your solar panels.

Return on Investment

Solar panels are a significant investment, and it’s important to know how long it will take for you to recoup that investment. By maximizing your solar panel ROI, you can ensure that you see a return on your investment in a reasonable amount of time.

Environmental Impact

In addition to cost savings, solar panels also have a positive impact on the environment. By using renewable energy, you can reduce your carbon footprint and contribute to a more sustainable future.

Key Strategies for Maximizing Solar Panel ROI

Now that we understand the importance of solar panel ROI, let’s explore some key strategies for maximizing it.

1. Choose the Right Solar Panel System

The first step in maximizing your solar panel ROI is to choose the right system for your needs. There are various types of solar panels available, and it’s important to consider factors such as efficiency, durability, and cost when making your decision.

It’s also essential to consider the size of your system. A larger system may generate more electricity, but it will also come with a higher upfront cost. It’s important to find the right balance between cost and energy production to maximize your ROI.

2. Optimize Your Solar Panel Placement

Solar panel placement

by micheile henderson (https://unsplash.com/@micheile)

The placement of your solar panels can have a significant impact on their efficiency and, therefore, your ROI. It’s important to ensure that your panels are placed in an area that receives ample sunlight throughout the day.

If possible, avoid shading from trees or buildings, as this can reduce the amount of energy your panels can generate. Additionally, consider the angle of your panels to maximize their exposure to the sun.

3. Take Advantage of Incentives and Tax Credits

Many governments and utility companies offer incentives and tax credits for those who invest in solar panels. These can significantly reduce the upfront cost of your system and increase your ROI.

Be sure to research the incentives and tax credits available in your area and take advantage of them when making your solar panel investment.

4. Monitor and Maintain Your System

To ensure that your solar panels are operating at their maximum efficiency, it’s important to monitor and maintain them regularly. This includes cleaning the panels to remove any dirt or debris that may be blocking sunlight and checking for any damage or malfunctions.

By keeping your system in top condition, you can ensure that you are getting the most out of your investment and maximizing your ROI.

Using a Solar Panel ROI Calculator

Solar panel ROI calculator

by Adam McCoid (https://unsplash.com/@adammakesfilm)

A solar panel ROI calculator is a valuable tool for anyone considering investing in solar panels. It allows you to input various factors such as system size, cost, and location to determine your potential ROI.

By using a solar panel ROI calculator, you can make informed decisions about your solar panel investment and ensure that you are getting the best possible return.

Real-World Examples of Solar Panel ROI

Let’s take a look at two real-world examples of solar panel ROI to better understand how it works.

Example 1: Residential Solar Panel System

John and Sarah are homeowners in California, and they are considering investing in a solar panel system for their home. After researching their options, they decide on a 5kW system that will cost them $15,000 upfront.

With the incentives and tax credits available in their area, they are able to reduce the cost to $10,000. They estimate that their system will generate $1,500 in electricity savings per year, resulting in a payback period of approximately 6.7 years.

After the payback period, they will continue to save $1,500 per year, resulting in a significant return on their investment.

Example 2: Commercial Solar Panel System

ABC Corporation is a manufacturing company in Arizona, and they are looking to reduce their energy costs and environmental impact. After researching their options, they decide to invest in a 100kW solar panel system that will cost them $200,000 upfront.

With the incentives and tax credits available in their area, they are able to reduce the cost to $150,000. They estimate that their system will generate $30,000 in electricity savings per year, resulting in a payback period of approximately 5 years.

After the payback period, they will continue to save $30,000 per year, resulting in a significant return on their investment.

Conclusion

Investing in solar panels is a smart decision for both cost savings and environmental impact. By choosing the right system, optimizing its placement, taking advantage of incentives, and using a solar panel ROI calculator, you can maximize your return on investment and reap the benefits of renewable energy for years to come.

Remember to regularly monitor and maintain your system to ensure that it continues to operate at its maximum efficiency. With these strategies in mind, you can confidently make the switch to solar and enjoy the many benefits it has to offer.

Published on December 27, 2023
Full Post

Get New Posts By Email