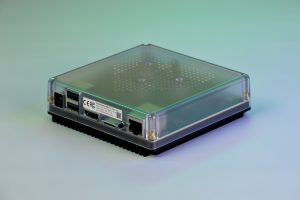
Gadget Wisdom

Author: David Shanske

Registration time

2011-09-25 06:23:49

Website

https://david.shanske.com/

Email

david@shanske.com

All posts by David Shanske

0 Responses

The Disney MagicBand+ as a Piece of Tech

Disney’s introduction of MagicBand technology was a massive change for the theme park. The overall system began development in 2008, with the idea of reducing friction in the park, and the over $1 billion dollar project to integrate technology at Disney parks culminated with a rollout a decade ago in 2013.

I remember the first experience with the MagicBands, and an experience with family members where the Disney staff just couldn’t fix the problems and kept giving old school paper documents. But, most of those sorts of issues were resolved.


Until the

MagicBand+

beginning of 2021, MagicBands were free to all Disney Resort guests….they’d even send you one with your name on it with advance reservations. But, in 2023, we have cell phones that can perform the same function and Disney added NFC support so you could use your phone in lieu. So, MagicBand became more of a collector’s item, or for children or other people without phone. Other guests can receive an RFID-enabled Key to the World card free of charge, and some people just put this in a lanyard in order to get the same utility of scanning as a MagicBand.

So, this brings us to MagicBand+, launched in 2022. It supports bluetooth pairing to your phone, software updates, and a bunch of ‘smart’ features. Disney compares MagicBand+ to MagicBand and to their MagicMobile Service(the phone apps). It’s waterproof, rechargeable, and unique to this device it ‘unlocks enchanting interactions’, in addition to what all of the choices do….unlock your room(if you have one), act as your ticket, check-in for virtual queues and lightning lanes, charge items to your account on file, link photos at rides.

So, I charged the thing up, linked it to the phone app via bluetooth, updated it, wore it for a whole day at Disneyland, and…well, it lit up once for five seconds. So…I was not enchanted. And I was not enchanted for $34.99. Reviews were equally mixed from others at both Disneyland and Disney World. You can’t seem to get original MagicBand anymore. So, the only use for this is so you don’t have to pull your phone out of your pocket to access things.

There are two types of scanners in a Disney park. The built-in ones you just run your hand over, and the mobile ones that ticket takers and others were using for other things, where they actually had to fiddle with it to put it into scan mode…so not much faster.

The MagicBand+ supports NFC, RFID, and BLE(for interactive experiences). It has 5 RGB LEDs as well as vibration ability. So, it is a nice little notification device. So, if you want, you could use an NFC/RFID scanner and use it to trigger events at home. There are some people trying to figure out how to connect to it over BLE and trigger the vibration and lighting system. I hope someone does the work on this, because it would allow me to recoup my investment more fully.

In researching this, the only device outside a theme park that can pair with it is an Amazon echo device, probably because of a partnership with Disney to allow certain experiences. People reported that they could pair the band and it would vibrate and light up in response to notifications. So, whatever custom pairing that requires a Disney app installed on your phone should be reproduceable. Other people reported that once paired, they were able to resend commands they monitored to trigger the device.

If not, there are other options for this that would be less expensive…the home options.

The idea Disney offered was interesting, but after all the money they spent on linking their experiences together, the band didn’t allow them to send me captured ride photos as promised, it didn’t present custom experiences, change screens in the park once it knew who I was…so, as a way of Disney customizing its experience..it was useless. But, now that I own it, I probably will reuse it just for the ability to wave myself into things over fumbling and unlocking my devices.


Published on December 22, 2023
Full Post
0 Responses

Setting up RTL_433 to Monitor Sensors

RTL_433 is an open source project hosted on GitHub. While the name implies it only handles devices on the 433MHz band, it also supports devices on 868 MHz, 315 MHz, 345 MHz, and 915 MHz bands. Not only are there presets to decode popular devices, there are instructions to write decoding profiles for unsupported devices.

Once installed, you can customize your /etc/rtl_433.conf to output to MQTT by adding:

output mqtt://localhost:1883,user=user,pass=password,retain=0

Customizing the hostname, port, username, and password for your MQTT broker. RTL_433 outputs event json and state json. So…you can monitor events as they happen or the state of individual devices.

I was surprised at how many devices I was able to pick up that weren’t mine, and ultimately filtered out devices by removing protocols from the rtl_433.conf file. I’m picking up not only my Acurite weather sensor, but other people’s temperature sensors, TPMS(tire pressure monitoring sensors), and more. I can feed my sensors(not the ones I accidentally pick up), into WeeWX(my weather system), and Home Assistant(my home automation system).


Published on December 8, 2023
Full Post
0 Responses

Updating the Sensors

The last time I added to this series was a few years ago. But a new writer wrote something on WeeWX on the site, and the technology has changed, so I decided to update what I had done. I moved from WeeWX-sdr over to WeeWX-MQTTSubscribe. MQTTSubscribe is actively developed by Rich Bell, and he is very responsive to issues. The extension can act as a driver or a service…so either as your primary source of weather data, or to add additional weather data.

The other advantage is that RTL_433 can run as a standalone service and now supports publishing to MQTT. So, it can decode my weather sensors as well as my 433MHz leak sensors. Oddly enough, I also seem to be picking up someone’s tire pressure sensors as well.

Elsewhere, I assembled custom sensors to get additional readings, running ESPhome, also sending their data via MQTT and being integrated by the same extension to WeeWX. This includes barometric pressure and particulates.

This means my WeeWX installation is much more robust, and modular. This is mirrored in my Home Assistant installation, where I’ve increasingly divided off some subsystems to act more independently.


Published on December 6, 2023
Full Post
0 Responses

Gadget Wisdom is Back Again

I love talking about technology, and I keep trying to keep up a posting schedule, and I admit I drift off. One of the classic site authors, The Captain, has returned to write articles. I will see about doing some more in-depth stuff as well.
Published on November 26, 2023
Full Post
1 Response

The Power of Weewx

There are a lot of different ways to store and use weather data. For my station, I wanted something that had a lot of built-in features and extensibility. I ended up with WeeWx, which is a well-supported python based project. They are currently in beta for Version 4.0.

WeeWx supports multiple sources for inputs, uploads to a variety of sites, and has extensions to add additional functionality. It generates reports that can be deployed by ftp or rsync to a remote website, or  as I do, you can host it on the computer running the software. WeeWx is lightweight enough you could host it on a Raspberry Pi. I do this for one of my weather stations. With the other, I’m hosting on the same computer that handles my Home Automation.

With something like a Pi, the biggest concern is frequent writes to the database. So if you are using a Pi, I suggest you use a database hosted elsewhere and transfer the reports to another computer, or you may wear out your microSD card. I will have to talk about my Pi issues another time, but the weak point on a Pi is the microSD card.

Installing WeeWx is simple as installing any other Linux package. Then, in order to receive data from 433MHz SDR(software defined radio) devices, the easiest way is to get an RTL-SDR USB dongle and add the extension, WeeWx-SDR. This requires a little compiling of various drivers to allow receipt of signals from a variety of different devices. It takes some trial and error to map the sensors to the right values in WeeWx though.This is just a matter of running an application and noting the output. However, once you do this, it stays stable…unless you change hardware. I am also using the Acurite Atlas, which is not in the stable version of RTL_433, the library that translates the 433MHz signals, but you can install the development branch.

I also supplement that data by running another extension, weewxMQTT, which I use to send in sensors that are not coming in via 433MHz. This is how I added a barometer, as I couldn’t find a 433MHz one. There is a robust set of examples from hobbyists of creatng MQTT enabled sensors using inexpensive wifi enabled boards like the NodeMCU or the D1 Mini.

After WeeWx is installed, and the drivers for the various sensors are added, the system will generate reports. The default skin, which is the template for the output, is probably sufficient for most people, but it can be customized, and alternate ones found online.

WeeWx also has built-in and extensible uploaders to send the data to various sources. I contribute to every source that will let me. Why discriminate?

Next, will cover some of the customizations I’ve put in.


Published on April 27, 2020
Full Post
0 Responses

Starting a Weather Station

A few years ago, I set up two weather stations. More recently, with me being stuck at home, I’ve made some tweaks and enhancements. I’ve invested some time in trying to figure out what I’d do if  I had to do it over again. So, in addition to improving the setup, I’m going to work on enhancing it.

At the moment, in one location, I’m using the Acurite Atlas weather station. The Acurite equipment is designed to be used with their station, or internet connected system, but I  do not do that. When I first started, I also used Acurite temperature sensors hooked into my Home Assistant instance to track internal temperature. But I’ve since dismantled that system and replaced it with a combination of other sensors.

Acurite is known as a low-end hobbyist brand, and while  there were some criticism with the accuracy of the Acurite 5-in-1 sensor, which I still use  in  one of my stations, the Atlas offers better accuracy and  several additional sensors.

All Acurite equipment transmits using a 433MHz radio, which can be picked up by a USB software defined radio  and  a program called RTL_433.  I’ve run this on a Raspberry Pi, and sent to a more robust system for storage There are alternative weather stations, which offer different ways to get the data, but the important part for me is to be able to get the data, because then I can do things with it, such as upload it to third party servers, display it, etc.

In future posts, I am going to get into more detail on how I set this up and what I’ve learned.

Published on April 14, 2020
Full Post
0 Responses

Taking Control Over Wifi Controlled Outlets

The Itead Sonoff line of products are inexpensive wifi controlled Smart Home devices that use a common chip, the ESP8266, which is popular amongst hobbyists for their own projects.

Continuing my goal of avoiding building my own hardware, I’ve focused on adaptive reuse. In order to use a Sonoff in its default configuration, you need their app, which routes information through their server in China.

I’m not that worried about the Chinese being able to control my humidifier, but I find it completely unnecessary. But, being as it uses a common chip, it can be reprogrammed.

The recommended and guaranteed way to do this is to solder connections onto the board and flash the chip with new firmware. However, one developer has worked to hijack the Sonoff’s over the air firmware update process to add custom firmware. You can find the work on Github along with custom firmware to install.

The custom firmware allows the device to be controlled by HTTP or MQTT control, which can then be tripped manually or by Home Automation software.

I have been using the Sonoff Socket S20, which is their remote controlled outlet. However, the same hardware is available as a wire-in power control module, as well as switches, temperature sensors, etc.

The control of these sockets has been reliable and without issue.


Published on October 14, 2017
Full Post
1 Response

Adding Temperature Sensing to Your Home Automation System On the Cheap

Problem

I wanted to be able to measure the temperature and humidity in various parts of my apartment, because the heating and cooling isn’t evenly distributed. My plan was to average those numbers and use it as a baseline to tune the heat and cooling, as opposed to the temperature just at the thermostat.

This is a feature of some thermostats, like the Ecobee, where they acknowledge the issue of one location making decisions for the comfort of the entire house.

I don’t want to solder. This is a personal decision. I burnt out too many components trying to learn that in high school. The best options for hobbyists in this area are to build their own, which I may try again someday.  So, I need a prebuilt solution.

Off the Shelf Options

There are a lack of good inexpensive temperature sensors that can be easily integrated into a Home Automation system. The best inexpensive option I found were some Z-Wave sensors made by Xiaomi(they’ll be here in a few weeks from China and I’ll see how that works).

I have, for a few years, had an Acurite 5 in 1 weather station mounted outside. It measures temperature, humidity, wind speed, wind direction, and rainfall. It broadcasts updates every 36 seconds.

It came with a wireless temperature and humidity sensor that updates every 16 seconds.

Implementing a Solution

So, I had one of these, and after I got this working, I bought several more to cover the areas I wanted to. The system is ultimately expandable without limit.

There are two ways to get this data into a computer. One is with the provided Acurite hardware. They make an Internet bridge..which you cannot get data from so easily. They also make USB devices, which you can interface with. I use this to run a weewx installation(more on this later).

But, the option I chose was based on what I had in house. A software defined radio USB dongle left over from my ADS-B project(more on that another time too).

On Github, you can download a project called RTL_433, which is designed to retrieve data from wireless temperature sensors. It also supports a variety of brands and other types of sensors. And, on a positive note, if you find something that operates on the same frequency, you can probably get it included.

The RTL_433 program supports output in JSON, which I can then feed into something to monitor the data and use it. I originally had planned to pre-process it with a script and then send it into Home Assistant.

I have the output from the sensors being converted to MQTT messages. But the messages from RTL_433 are all merged together, coming from the same source.

Someone in the Home Assistant Discord chat room suggested I use Home Assistant itself for pre-processing.

- alias: rtl433_bedroom_convert
 trigger:
 - platform: mqtt
 topic: sensors/rtl_433
 condition:
 condition: template
 value_template: >
 {% if trigger.payload_json.id %}
 {{ trigger.payload_json.id == 494 }}
 {% else %}
 false
 {% endif %}
 action:
 - service: mqtt.publish
 data_template:
 topic: rtl433/bedroom
 payload: '{ "temperature_F" : {{ trigger.payload_json.temperature_F | round(1) }}, "humidity" : {{ trigger.payload_json.humidity }}, "model" : "{{ trigger.payload_json.model }}" }'

This is triggered when a sensor transmission comes in, and the id number is ‘494’, which is the sensor in my bedroom. It converts the payload into its own specific message that can be picked up not only by Home Assistant, but by anything that is monitoring these messages(dashboard anyone?)

You may notice a few things here. The sensors I have do support humidity for example…I’ll be using that as part of my climate control project. I am also rounding the temperature to a single decimal point, where the system supports 2 decimals. I do pass a few other parameters I am not yet using, such as battery on the sensor, which I’ll likely set up a notification on.

Published on October 9, 2017
Full Post
0 Responses

How to Choose the Brain for Your Home: Options for a Home Automation Hub


You can do Home Automation without any sort of hub. I still have one, the Wink hub. I chose it over Smart Things, the biggest competitor, for various reasons, but both have their place.

However, I have been moving to my own homebuilt system. I centered on a project called Home Assistant.

There are alternatives…OpenHAB, which uses Java, but Home Assistant has a good combination of ease of use and flexibility, so I am going to focus on it.

Home Assistant has a very active community of people and developers, which is an advantage. It is a Python based implementation and there is a distribution specifically for the Raspberry Pi making it easy to get started. New releases with new features happen about every two weeks.

I’m running it on an always-on system I already had, rather than a Pi, and I’ve spent a lot of my spare time building in support for items…and I keep adding piece after piece of integration.

Next up, my first integrations.

Published on October 8, 2017
Full Post
0 Responses

Starting with Security and Lighting

The two areas that I see a lot of interest in controlling are security and lighting. With the introduction of the Amazon Echo and its ilk, people want to turn their lights on and off with their voice assistant. It is often the gateway drug into more insanity.

One can start with just screwing in an alternative light bulb.

The other one, the more elusive for me, is security. I’ve never had a traditional security system with monitoring. But I’m increasingly interested in building my own. But it is hard to figure out what that is.

Paying for monitoring is not something I am prepared to do. You are paying a company to notify the police. I can do that. Notifying the police isn’t something I want to be automatic, because over 90 percent of alarm calls by police are false and there are actually fines for false alarms in New York City, where I live, and many other places.

We have one of the best security monitoring devices on us most of the time…the cell phone. If I can be notified by my phone and review the information, then I can make decisions based on that action. I’m going to talk about various notification options as well.

Recently, a family friend had to drive back home because their alarm was tripped. It was a false alarm, but the second that week.

Some of this, I am learning about as I go. So, I welcome anyone correcting me or giving me advice.

Published on October 3, 2017
Full Post

Get New Posts By Email