
Gadget Wisdom

0 Responses

Exploring Unique Keyboard Layouts: MiniLA, HHKB, and Beyond

I’ve been talking about keyboards as a regular topic for a while. And as I’ve been delving into the topic, I’ve found the idea of unique and different layouts to be something worth experimenting with. That brings us to the MiniLA and the HHKB layouts for keyboards.

MiniLa Keyboard Layout

The MiniLa, or the Minimal Layout, is a 60% layout designed to be as minimal as possible without sacrificing functionality. The left shift is 2U and the right shift is only 1U…1U being a standard key size. The spacebar is 3U, half the size of the standard spacebar, which allows for extra keys to right and left. This allows for full arrow keys, which usually don’t fit in a 60% profile. The left Control is 1.75U…the same size as the Caps Lock key. The default layout has a split backspace, making backspace also a 1U. You can find the original MiniLa keyboard here.

HHKB Keyboard Layout

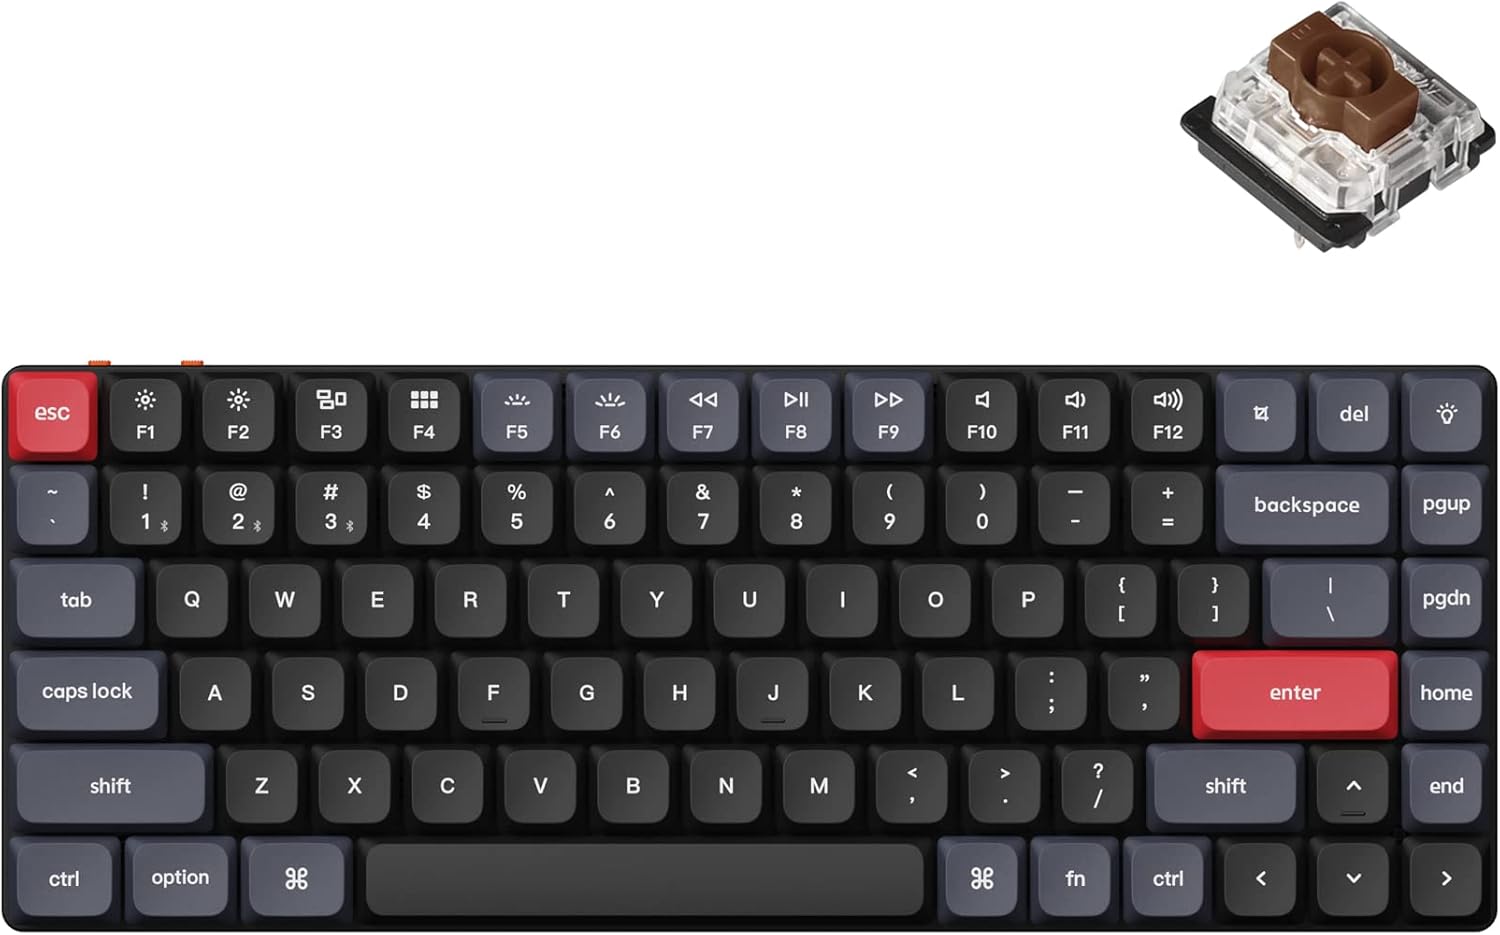
The other unique layout in the 60% form factor is the HHKB layout, or the Happy Hacker Keyboard. Control replaces the seldom used Caps Lock key, putting it in a more convenient place, The layout also drops the Backspace/Delete key to where the Backslash is, which allows it to be used in touch typing more easily. There really is no practical reason for the backslash to be a 1.5U key. It also makes this primarily a Delete key, with Backspace as a layered functioned. Since the Control Key is missing, the bottom row is reduced down to the spacebar and 2 keys on each side, as opposed to three on a standard layout.  In place of a 2u backspace, the space is occupied by the backslash key and the Backtick/Tilde key, which is normally on the left as that space is where the Escape key is. You can find the original HHKB keyboard wired here, or wireless here.

Both of the above use a standard QWERTY layout, with only the modifier keys being shifted around. But as I previously mentioned, another alternative to the Caps Lock key placement is inherent in the Colemak layout, where it provides another backspace, reducing the need to stretch one’s finger to the backspace position.

In all of these layouts, extraneous keys are removed, replacing functionality with layers…key combinations that produce the key, reducing finger travel and allowing for closer placement of the mouse next to the keyboard. Over time, people have come up with even smaller layouts than the 60% variations. The 40%, which drops the number row, and is a 4×12 layout. The QAZ, which removes a column from the left side. 30% drops the keyboard down even further to 3×10. Most people won’t go below 60 though, and some think even that is too small.

Even though most people won’t use the smaller layouts, there is a dedicated group of people who use and love them. But, even with the traditional layouts, there are ways to optimize them to your usage. As I’ve said before, ask yourself…what keys don’t you use very often? Maybe you could have a smaller keyboard, which would take up less space. But some individuals do like the choice.


Published on January 15, 2025
Full Post
0 Responses

Monitor Ergonomics: Using Taller Monitor Mounts For Better Comfort

In pursuit of the perfect ergonomic desk setup, I’ve added deskmats, tried different keyboards, adjusted many things…and continue to do some. But recently, when I found myself visiting family, I was experiencing some discomfort in my back as I sat at the desk in their guest room and I decided to upgrade the ergonomics of my monitors.

An image of the Wali Dual Monitor Mount
Wali Monitor Mount

I have multiple desks to  configure. Work, home, the guest room at relative’s homes where I sometimes work when I visit. This location is the one I visit the least, so I built a dual monitor setup there out of retired parts from my own desk. Older monitors I’d upgraded but were still good, and a new mount. But it was the mount I sought to replace. It was a standard dual mount monitor mount pole from Wali.

Upgrading Monitor Ergonomics

There are several inexpensive companies that make products I use for this….this one was from Wali. The pole is 16 inches long. That just doesn’t work for a taller individual…and this is not explained by most manufacturers. There is an almost identical one from Vivo.

I mention Vivo as it seems like Vivo and Wali are manufactured by the same factory. Their pole mounts have several features I like in a budget mount. For one, the plate is removable, can be attached to the back of the monitor, then slipped onto the arm and secured with a nut. Many of these arms require you to attach the monitor to the arm, which is definitely more difficult. I previously wrote about the simple Vivo Livestream Device Shelf Mount.

But I found, at my height, I was looking down at the monitor. Ergonomics experts say the top of the screen should be at or slightly below eye level. So, you can get the 32 inch tall version of the Wali. Or in my case, get the pole and reuse the arm. I actually have the 39 inch tall version in my apartment, but I also have more than one thing mounted to the arm, not just the monitor arm.  This height would also allow you to have a second screen on top of, as opposed to next to the first.  You can buy all sorts of accessories from Vivo and Wali…extra arms, laptop mounts for the arms, etc.

People also often use these taller poles to mount monitors in portrait mode…a configuration which has its fans.The idea is that it makes focusing on a part of the screen easier for reading. This is often in a dual monitor system, with one monitor oriented this way. There are also other considerations depending on how large your monitor is. Some have switched from the now ‘quaint’ dual monitor setup to a single ultra wide monitor…where they separate it in a similar way in digital space to the way you handle things when you have separate monitors. And that can also help with ergonomics.

Your monitor is supposed to be about arms length from your eyes, however the larger the viewing area is the farther away you might want to be from the screen. At the same time, your keyboard should be even with your elbows.

In the end, start at the recommended distance and height for your monitors. You may adjust over time as you find what is most comfortable for to get the best ergonomic monitor setup.


Published on December 31, 2024
Full Post
0 Responses

How To Try Out ClassicPress- A Throwback WordPress Alternative

I choose to self-host my site on a VPS. But I know that isn’t for everyone. If you can install WordPress on a shared host, ClassicPress installs the same way. For that reason, many people shared hosting services have a one-click ClassicPress install alongside their WordPress one-click install.

ClassicPress has less of an admin tax than WordPress…the way WordPress used to be. An administration tax is the time you spend administering a site over actually creating content for it. WordPress and ClassicPress both have some of this…but as WordPress moves farther and farther away from its roots, you end up having to update things to work well with the latest. This means that while right now, most WordPress plugins work with ClassicPress…that might increasingly not be the case….at least not without a small amount of work.

For my own plugins, I intend to test them against both systems for the foreseeable future. But as WordPress drifts further away from its roots, and therefore from ClassicPress, people writing plugins that can work without the block editor dependencies becomes increasingly important.

If you already have a WordPress Site, you can install the ClassicPress migration plugin. You can install ClassicPress by following the other options here.

Published on December 24, 2024
Full Post
0 Responses

As WordPress Leader Rants, Time To Reach For a Classic With ClassicPress

On my personal website, I do occasionally talk about the future of WordPress and my issues in developing plugins for my own use. But I also maintain the Gadget Wisdom infrastructure. So, recently, I wrote about switching my personal site to ClassicPress. I’m going to continue to write about that there, but wanted to cover a little of this here, in a different context.

Recent drama at WordPress finds a lot of people exploring exits from the community. WordPress drama is not a new thing. There were many times during the transition from WordPress 4.9 to 5.0 I considered leaving. But having built many things on top of a platform, I opted to remain.

More recently, I switched this site over to ClassicPress as well, a fork of WordPress. ClassicPress has a simple plugin to migrate WordPress instances…it will even let you revert back if need be. So, while the drama over on the WordPress side may continue, I get to keep the platform without the elements that frustrate me. There are concerns about ClassicPress as well. WordPress powers a significant percentage of identifiable websites. Forks of projects do not always survive, but there are many examples where they do.

ClassicPress is a fork of WordPress that removes the block editor…WordPress’s big change in Version 5. It retains a traditional editor, which many people prefer, and continues to iterate in that direction. As a result, it is leaner and somewhat more performative. It is WordPress as it used to be…but also with improvements…but in a completely different direction than WordPress while maintaining compatibility. The only problem is that the project doesn’t get the attention it could, especially now that people are questioning the governance of WordPress. But it is WordPress…like it used to be…before it went hard in another direction.


Published on December 24, 2024
Full Post
1 Response

Flat Out Awesome: Why Desk Mats Are the Unsung Heroes of Your Workspace

This is one of those topics I hadn’t given much thought to over the years was desk mats. The most popular reason to have a mat on your desk was always for your mouse, but then optical mice came in and made that less needed, and I use a trackball anyway. But more recently, due to the fact I have been trying a lot of different type of keyboards, have become more aware of those accessories around it.

Why a Desk Mat?

  • Protecting the surface of your desk
  • Noise reduction as it reduces vibrations from your keyboard
  • Prevents a keyboard from sliding around your desk.
  • Aesthetics…they come in a variety of colors and designs.
  • If you do have an optical mouse, some surfaces aren’t friendly to it.
  • Cushions your wrist…similarly or in addition to a dedicated wrist rest.

So, I decided to take the same tactic I do with the mat in my bathroom. I have more than one color, and occasionally, when I need a change, I rotate it to change the feel of the place. I bought this mat on Amazon for only $8. You can go even less expensive, or more luxurious. You can choose a larger one, depending on your desk, or a thicker one to reduce vibrations even more. I even saw one on sale not long ago with a built in LED light border if you want your desk to look like something from the movie Tron.

I even carry a slightly smaller mat now in my travel bag to put down my travel keyboard on. It really helps in the uneven places


Published on December 5, 2024
Full Post
0 Responses

There Is No Place Like Homelab- Why You Need One In Your Life

When I started writing about technology, I don’t think the term homelab existed. I only started hearing it more recently. But like many things, I apparently had one before the term existed. Homelab usually refers to a computer or computers used within your home to experiment. People self-host applications in their homelabs, they build network attached storage, they host and serve their media files. Some people use it to experiment with technologies they might need to or wish to use professionally.

The communities of hobbyists and tech enthusiasts have changed a lot over those years. I still remember when buying a single megabyte of RAM was a big deal, or having a whole 40MB of hard drive space. There is so much out there to experiment with and I’ve been running a homelab without even realizing that’s what I could call it.

A homelab can be as simple as an old retired computer you run a server on. Or it could be a custom built system for purpose. I’ve had both. And I’ve repurposed numerous times before the end of computer hardware’s life cycle.

I’ve written a lot about topics that fall under that previously…self-hosting, storage, media, etc. So, thinking about this under the banner of homelab gives me the chance to talk about this idea of running your own applications on either your home server, or server space you rent outside your house, and the infrastructure I’ve created to do just that. And there is always a new application or new need to experiment with.

A quick warning though. If you experiment in your own home, you do have to be aware that…should you share that home with someone else, that your experiments may affect their quality of life. For example, if you are playing with home automation, they might not appreciate if you cover up the light switches so you can use smart bulbs they can’t control.

That said, let’s get started.

Published on December 4, 2024
Full Post
0 Responses

Sitting At The Docker By The Drive Bay: TrueNAS Scale Switches to Docker – But Why Docker?

As part of my continuing, Building My NAS series, I wrote about choosing TrueNAS as the software powering my homebuilt network attached storage device. One of the features of TrueNAS Scale has been the ability to run various self-hosted cloud applications. In the latest version of TrueNAS, the backend for those applications switches to Docker. Docker is arguably the most popular way to deploy pre-built complete applications. It not only isolates each application into its own container, but it simplifies the process of deploying and configuring them.

While the number of applications offered directly in TrueNAS, the switch to Docker allows for tens of thousands of public docker files to set up many more applications than are officially supported.

After years of installing applications on the servers that host them, I’ve reluctantly embraced Docker as a solution for when specific combinations are needed, such as specific versions of software. Looking at why other people use it, it is the…”it just works” philosophy. You can install an application, reinstall it cleanly, isolate it from other things…simplicity has its advantages.

It makes Docker a great way to quickly switch from third party services to your own. And combined with a system like TrueNAS providing storage solutions, it can create the basis for a complete solution for yourself and your home.

Published on December 1, 2024
Full Post
0 Responses

Key-ping a Low Profile- Is a Low Profile(Ultra-Slim) Keyboard the Best Keyboard for Travel?

I recently took two trips out of town. I have been evolving my hotel room set up for years after my employer had me spend extended times in hotel rooms and it always involves an external mechanical keyboard. I had written about the folding keyboard search as part of this previously. In that article, I only mentioned the Royal Kludge F68 in that context as a mechanical low profile keyboard that folds. But I didn’t talk about low profile keyboards themselves. I’m limiting myself to mechanical keyboards per my preference for them.

A low profile mechanical keyboard, also called an ‘ultra-slim’, even in a larger form factor, can take up less space than a comparable keyboard and still have some of the advantages of mechanical keyboards. Like full size mechanical keyboards, you have keyboards with hotswappable switches and ones without. While they come in larger sizes, for travel a 75% or smaller makes sense.

Some people find the low profile keyboards better for ergonomics. Also, if you are coming from a laptop keyboard, the angle can be similar enough, but it is definitely a more premium experience.

I tried out the Keychron K3. There are several revisions and variants, and the newer ones have QMK/VIA and different wireless capabilities. For example, the K3 Pro which is hotswap and bluetooth.  The K3 is a 75%. The smallest Keychron makes is the K7 at 65%. I was able to get a hotswappable K3 on a deal, and that allows me to try different Gateron low profile switches. It came with Browns, but there are other ones to try that may be more to my liking. Either way, I was perfectly satisfied with using these on those recent trips. I even printed a case to transport it.

There is also the Azio Cascade Slim, which is hotswappable, and finally the more expensive and often reviewed alternative is the Nuphy line. They make the Air60, and Air75 variants that fit into the travel category.

Finally, on the budget side, Royal Kludge, in addition to my F68, has the N80 Low Profile 75%. It includes a little LCD screen. Redragon, also known for being on the less expensive side, has the K652. Both are budget models that get decent, if mixed reviews. The Redragon K652 is hotswappable with the Outemu low profile switches. The Royal Kludge uses their own branded low profiles and is hotswappable. However, some research suggests TTC or Cherry MX LP switches are compatible.

You can also go with the entirely niche, but prebuilt Chosfox Geonix48…another Ortho, or their L75 75% keyboard.

Even kit-wise, if you want to build one. There is the 60% Cerberus from Pikatea….which is ceasing operations in December of 2024. Boardsource has the Equals48 and Equals60 kits, which are both Ortholinear keyboards.

The two most popular low profile switches are the Gateron Low Profile and the Choc V1 Low Profile. The Keychrone, Azio, and Nuphy all use the Gateron type. Choc V1 seems to be the domain of ergonomic type keyboards mostly. Despite the useful utility of this category, it seems as if the low profile market for traditional form factors is limited.

In the end, after all that, there are some good options…and most of the choices come in traditional red, blue, or brown switches, so you should be able to find something to suit your preferences.


Published on November 29, 2024
Full Post
0 Responses

Retro Gaming and the Original Nintendo

Earlier this summer, I dug my old Nintendo Entertainment System out of a box. I have been trying to reduce the boxes of stuff I retain that I don’t use. I have built some emulators to allow me to relieve some of the games of my youth…but nothing is like the authentic original experience. So I plugged the Nintendo in…and relived the frequent issue of my childhood…the flashing red light. When I was a kid, the solution to that was to blow on the cartridge. However, it is the 21st century now, and I have the internet to research an issue.

After going down some rabbit holes, I discovered that you could add an HDMI output with a board that someone developed…and is no longer sold…and a variety of other interesting items. But I was able to secure a new power adapter, a replacement cartridge connector, and an RCA to HDMI adapter.

So, if you have an old game system in your closet, why not take it out, clean it up, maybe refinish it a bit, and restore it to a place of use?

If you don’t want to do that…there’s always the other way. I discovered I had just missed a large event in my hometown of New York. The Long Island Retro Gaming Expo at the Cradle of Aviation museum. There is a community of enthusiastic people in every fandom if you just look.

In the meantime…can someone help me fix my Super Nintendo?


Published on November 19, 2024
Full Post
0 Responses

Building A Video Studio

Recently, I agreed to run remote participation for a three track one day conference. Remote as in I was not in the same city as the event, and running it out of my home. I’ve done this several times and keep trying And this involves setting up three separate computers, one to monitor each room. A volunteer physically present would join the Zoom meeting from the room. During the height of the pandemic, I had done similarly when the events were all remote.

This can be something of a challenge. My desk is set up for my work and non-work activities. I have a dual set of monitors hooked into a KVM switch. A KVM switch allows you to share keyboard, video, and mouse between multiple computers. Since most of the time I only need those two computers, it does not have the ability for three. My work computer is a laptop with a dock, and my home computer is a regular PC. My work computer cannot be used for non-work purposes, but I have some old laptops I’ve docked in its place that have enough power to run Zoom.

Nearby in the room is yet a fourth monitor…my television. I have an auxiliary HDMI cable running from the TV over to the computers which would allow me to connect it to display things on the TV as an extra monitor. I currently have it unhooked.

Finally, I added a small portable USB powered monitor, which sits above the other two monitors, and is hooked into a third computer. This I had previously used as a Zoom computer, to pipe a second person’s audio in. But I stopped being the sound engineer for dual host audio podcasts. I’d invested in the cheapest Atem Mini, which is a video switcher, to explore the possibility of upgrading to video, but never ended up moving in that direction. So, I have enough equipment, with some tweaking to set up a little recording studio.

I also am a remote participant, so I want to be able to monitor 3 rooms, while actively participating in one, but I don’t want to run around disconnecting cameras and reconnecting them. My camera is an HDMI camera, hooked into an original Atem Mini. So, I realized after trying to deal with this, I could split the HDMI output from the Atem MIni into multiple HDMI cables, running into multiple USB capture devices.

I use a separate XLR microphones, which I could do the same with…feed the audio into the Atem Mini and carry it along with the video to the secondary systems.

The confusing part here is the sheer number of combinations for use. For convenience, I’m going to refer to my primary computer as #1, the Zoom computer as #2, and the theoretical old laptop docked in place of my work computer as #3. Some of these are not scenarios I’ve ever needed, but have considered for future.

  • I am a solo participant in a single Zoom room, and I want to be able to use #2 to control the Atem Mini, and have it display on either the little screen above my desk or the television. I want the camera and microphone to feed into #2, but split off to feed the other computers for other use cases. Here, there are issues because I may want to screen share from #1, my primary computer, where I have things to share. The screen share issue is why I haven’t tried this configuration.
  • I am a solo participant, and therefore, will only use #1 for my meeting, where I can screen share. The Atem Mini will be connected to #1, however, it will split off to feed the audio/video into #2 and #3 as needed.
  • I am trying to run 3 separate Zoom rooms, and therefore need all three computers running separate Zoom clients so they can record sessions, but I need to feed my audio/video to each one. I also need to monitor audio levels in each room somehow and see if there is a problem.
  • I want to record a video podcast, where #2 is feeding in a remote host, #1 is recording and hooked to the Atem Mini to allow in ‘studio’ participants to be mixed with the remote ones. In this scenario, I also need to be able to share from #3 as a video feed, to mix into the final recording.

Trying to figure out a wiring diagram to cover all these use cases so I don’t keep patching and repatching cabling. I’m starting by laying out the problem, and then, over time, hoping to document how I explored each option and implemented it.


Published on November 19, 2024
Full Post

Get New Posts By Email