
Gadget Wisdom

Illustration of a person monitoring POE security cameras using Frigate NVR software on a computer, with outdoor cameras mounted on a house and detection alerts shown on screen.
0 Responses

Why I Switched to POE Cameras and Frigate for Home Surveillance

Illustration of a person monitoring POE security cameras using Frigate NVR software on a computer, with outdoor cameras mounted on a house and detection alerts shown on screen.


During my recent renovation, I added two additional cameras to my new space, at the two points of ingress. This was something of a departure as these were also the first Power Over Ethernet(POE) cameras I’ve had installed, as I had someone on-site available who could run the cables cleanly.

I’ve tried a variety of ecosystems for cameras, both for myself and others. Many f them push you toward subscription-based cloud services, which features like video history, motion detection, and notifications only work fully if you pay monthly. Some of them barely provide any features without paying, despite the fact you bought the device.  Even when offering local options, this is often storage with a microSD card in the camera, which is clunky, slow, and unreliable.

That is why I decided to go with a network video recorder. A server that takes the feeds from all the cameras and stores the recordings. You can buy commercial NVRs you can purchase and install in your house, including some that integrate with the specific hardware cameras you bought, but I wanted a solution that aligned with my philosophy of self-hosted, privacy first smart home tech.

So I chose Frigate.

Why Frigate?

Frigate is an open-source NVR designed for real-time object detection all running on local hardware. It is deeply customizable and can be tuned to only record what matters to you – people, cars, or animals, depending on what zones and filters you decide.

For example, one of my outdoor camera flagged every pedestrian across the street, which is well outside of the zone I am concerned about. I can narrow the zone to only my property, to dramatically reduce noise in footage and alerts.

Frigate, recently added:

  • facial recognition
  • license plate recognition.
  • View-only user roles for shared access

Everything is processed locally, with no cloud dependency.

Frigate+: Smarter Detection, Optional Subscription

To improve detection, you can also subscribe to Frigate+, a $50/year subscription which offers better trained models for detection. These are trained by other users of Frigate. You can participate by submitting false positives and other information voluntarily. If you cancel, you get to keep the downloaded models, you just stop getting updates.

This helps support the developers and doesn’t lock you into a traditional subscription model.

Frigate Notifications

One gap in the core Frigate setup is the lack of built-in robust multi-platform notifications. That’s where another piece of software, Frigate- Notify, comes in. It ofers all of the notification options I might want.

  • Rich notifications
  • Cross-platform delivery including mobile, desktop, and messaging apps
  • Fully customizable

Next Steps For My Frigate NVR

Inspired by how well the new system is performing, I plan to replace more of my older Wi-Fi cameras with wired POE models for improved reliability. Wired cameras streaming directly to my NVR reduces lag, improves reliability, and gives me full control over recording, storage, and alerts—without the cloud.

If you’re tired of cloud lock-in and unreliable Wi-Fi cams, and you want a privacy-respecting, smarter surveillance system, Frigate + POE may be the combo you’ve been looking for.


Published on September 8, 2025
Full Post
0 Responses

Ikea and a 3D Printer: A Match Made in Heaven

For those who like modularity and creativity, Ikea has always been an option for budget items you can creatively customize your home with. If you love modularity, creativity, and solving problems with practical tools, then you’ve probably explored Ikea hacks before. For years, budget-minded makers have been customizing Ikea furniture—reinforcing it, repurposing it, reimagining it.

But once you add a 3D printer to the mix, your options explode. Over the last few months, as I’ve repurposed and upgraded some existing Ikea pieces in my home, I’ve been designing and printing small parts to improve functionality, adapt legacy hardware, and customize how each piece fits into my space.

However, when you combine Ikea with a 3D printer, you can take your creativity to a new level. As I repurpose existing Ikea pieces, I have tried:

  • Reinforcing brackets to strabilixe old pieces and prevent wobblying
  • Adapters to help newer fittings fit older discontinued pieces
  • Shelf drilling guides to add extra shelf holes to bookcases
  • reproduction of spare parts such as hinges, pegs, and clips
  • Wire grommets to cleanly route wires through desks or cabinets
  • Adding pegboard to the side of bookcases and others
  • Custom organizers and brackets for Ikea systems such as the Skadis pegboard system
  • Skadis panels of sizes not available
  • Device mounts and cable clips.

Some of these are practical—stopping a wobbly Billy bookcase from breaking. Others are creative, like turning a plain desk into a smarter command station with cable management, a microphone arm, and mounted shelves.

What makes this approach powerful is that 3D printing restores and extends the modular spirit of Ikea. Not only can you get parts free from other people, you can design your own, print fast, and you can tweak them to fit your exact needs—no settling for generic “close enough” hardware.

Ikea has always been about customization on a budget. With a 3D printer, that customization doesn’t stop at rearranging shelves—it extends to the components themselves. You can reinforce, revive, and reimagine every flat-packed piece you own.

Published on September 5, 2025
Full Post
Organizing 20 years of photos with immich
0 Responses

I Tried to Organize 20 Years of Photos —Here’s What I Discovered

Organizing 20 years of photos with immich

Previously, I discussed trying to consolidate my photo storage using Immich. I didn’t realize what a job it would end up being to get everything together and organized. With all of the various places I have stashed files over the last few years. I started with the easy sources, going through servers and various backups, and starting to bring files in.

That included:

  • Google Takeout for Google Photos
  • Downloads from online backups
  • NextCloud File Sync, which replaced things like Dropbox for me years ago
  • Digitized files from Bulk Scans

Unfortunately, there were issues.

  • Modern photo software shows things in a timeline, but backups from some services return your files stripped of metadata.
  • Scans of photos from prior to digital cameras don’t have detailed dates.

What is Metadata?

If you don’t know, metadata is data about data. So, for photos, this is often embedded in the photo itself. Your phone will embed data in the file about

  • When the photo was taken
  • Where the photo was taken
  • Who took the photo
  • Tags
  • Description
  • Face identification

This is added to varying degrees, and serious photographers will spend a fair amount of time working on the metadata of their files. Most people who tag or otherwise add information to photos do it in the photo storage solution. And apparently, for ‘privacy reasons’, sites strip the metadata from the file and store it in the database, so when you extract your files…they don’t always put it back.

Digitizing Old Photos

I made some mistakes over the years by bulk scanning and dumping digital files. I paid to have my father’s 35mm slides scanned by an outside company and I ran hundreds of photos through a photo scanner. What would the mistake be? I didn’t immediately organize those files. I had family members who said they wanted to help with that, and…well, life happens. So, if they haven’t in the decade since I scanned these, despite looking at them many times, they probably won’t.

Paper photos often had the month and year they were printed on them, which narrows it down, but that means I have to pull the original albums and try to reconstruct the past, which can be a massive project when you don’t clearly remember some things, and some of the family photos predate your birth.

So, I need some reasonable steps to move forward:

  • Get all the photos and possible metadata imported
  • Check filenames that might have date information in them and update the files.
  • Try to identify locations of photos that can be identified and store that.
  • For dates that can’t be positively identified, estimate the month or year. Or the decade. At least they will be in roughly the right order.
  • Start tagging items and organizing them.
  • Use family members and other documentation to try and narrow things down.

This all may be a massive project, and may not be done for some time, but when it is done, the effort will hopefully be worth it.

Published on September 3, 2025
Full Post
0 Responses

Why a Home Theater Setup Still Beats a Soundbar in 2025

As part of my recent move, I dismantled and reassembled my home theater. It is not brand new, I built it, piece by piece, over previous years, and have done several upgrades since. A new receiver, a replacement center speaker, and so on.

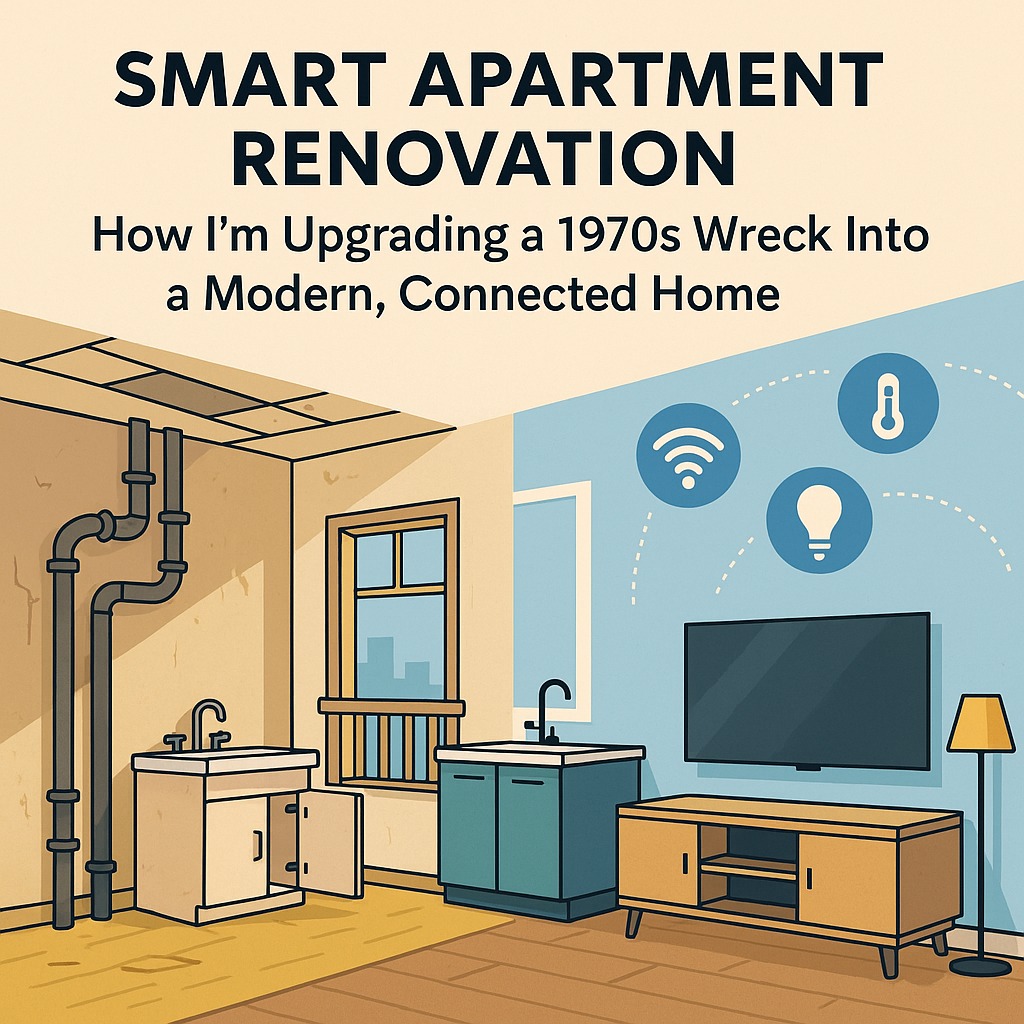
As I reassembled it in my new space, I started wondering: In 2025, is it still worth the time, effort, and wiring to build a home theater with surround speakers?

The Case for Real Surround Sound

TVs have gotten thinner, sleeker, and smarter—but one thing they haven’t improved is *sound quality. You simply can’t fit great speakers into a wafer-thin LCD panel. That’s why soundbars have exploded in popularity—they’re compact, plug-and-play, and simulate directional audio reasonably well.

Soundbars may simulate directional sound, but they don’t even come close to matching the immersion of discrete surround speakers.

With a full surround setup you get:

  • True directionality – not simulation
  • A dedicated center channel that keeps dialogue clear
  • Rear speakers that provide real spatial effects
  • A subwoofer(which is where the .1 comes in 5.1 and 7.1 sound), delivering bass

I started with a 5.1 channel setup and a 7.1 channel receiver, so I wanted more. But my space didn’t support the extra side channels well, so I upgrade to a 5.1.2 Atmos configuration instead.

What is 5.1.2 Atmos?

  • 5 speakers (front left, center, front right, rear left, rear right
  • 1 subwoofer
  • 2 height/ceiling speakers for vertical sound staging

This setup enables Dolby Atmos, which brings sound from above and gives movies and games a cinematic, three-dimensional feel—especially when properly calibrated.

Still More to Do

Now that everything is in, I’ll be returning to this project in future to better calibrate the system and do some other improvements to improve the sound of the space. That includes further adjustments to the speaker placement, calibrations in software, EQ, as well as room treatments and layout adjustments to improve the acoustics in the space. As of now, I have not hung anything on the wall or even tacked down the wires to the rear speakers.

But even with the basic calibration I did, the difference between it and just the TV speaker is incredible. Dialogue is crisp, surround effects are immersive, and explosions feel like explosions.

I won’t claim to be a home theater expert, and there are much more expensive and elaborate setups, but even with this basic approach, it is a world of difference.

Final Thoughts

Is it worth upgrading beyond your TV’s built-in speakers or a basic soundbar?

Absolutely.

If your space allows for speaker placement—and you’re willing to do a bit of work to get it right—a home theater system with a full surround configuration (especially with Atmos support) will blow you away.

Movie nights are back. Now… who’s bringing popcorn?

Published on September 1, 2025
Full Post
0 Responses

Designing a B-Mode: How I’m Building Fail-Safe Smart Home Devices with ESPHome

In a previous post, I discussed migrating to ESPHome for my smart devices. That initial migration was pretty straightforward—flashing firmware, configuring YAML, and getting basic functionality running.

But now I’ve started refining things. ESPHome isn’t just about turning things on and off. It’s about designing smarter devices—devices that don’t just rely on a central hub, but can think for themselves when they need to.

Dawn-Dusk Automation

The first item I built using ESPHome was dawn to dusk lighting control. ESPHome makes this possible with its sun component, which calculates sunrise and sunset time based on provided latitude and longitude.

To make that work, you need a time source. The most popular one is getting it from Home Assistant, but you can also use:

  • An NTP server, for independence from your Home Assistant instance, but still requiring a local or remote time server.
  • RTC Hardware Clocks for full independence

Switches and Manual Overrides

Next, I added a templated switch. These aren’t tied to physical hardware and control logic on the device (e.g. enable/disable the dawn-dusk logic).

This gives me some flexibility. For my style of planning,I want any automations running on device to be something that can be disabled if from Home Assistant, which has more capabilities. Simple logic runs locally, but still is controlled by the larger brain.

Important External States for Smarter On-Device Logic

ESPHome allows you to import the state of external entities into your device. Most commonly, you would sync states from Home Assistant, but there is a more powerful alternative in the packet transport component.

This component lets you import the state of sensors to be shared directly ESPHome device to ESPHome Device without a server in between. Even if a server crashes, the system still works, even if the functionality may be limited.

Designing for Failure: My “B-Mode” Smart Home

Resilence is something I prefer to prioritize. Inspired by Disney theme park ride design, I’ve incorporated what I call “B-Mode”.

In Disney-speak, A-Mode is full, ideal operation. B-Mode is what happens when something breaks—so the show can go on, just in a simplified form.

In my design, B-Mode is:

  • Smart lights that fall back to dawn-dusk mode if Home Assistant is unreachable
  • Ability to enable/disable on-device automations by communicating directly with the device
  • Direct Connections between devices to keep key functions running locally
  • Physical Buttons that Always Work, even if the connection is down

And the key: none of this happens by accident. You have to plan for outages and decide what should keep working in your design. ESPHome gives you the tools.

? Final Thought

Your smart home shouldn’t break just because your server does.

With ESPHome, you can build resilience into every device—whether it’s a light switch, a plug, or a sensor. Start simple. Add layers. Think about what matters when things fail.

That’s what B-Mode is all about.


Published on August 29, 2025
Full Post
0 Responses

When 3D Prints Melt in the Mail: A Filament Wake-Up Call


Honey I melted my 3D print!

I recently mailed a small 3D-printed item—nothing fancy, just something I’d made many  times before using PLA filament. A few days later, the recipient reached out with a picture: the item was warped, distorted just enough to be unusable. This was a first. I’ve shipped PLA prints before, even during the summer, without issue.

But this time, the destination was baking under triple-digit temperatures, and the package had likely spent hours in a sweltering metal mailbox or the back of a delivery truck. It turns out, that’s all it took to ruin the print.

That incident was a wake-up call—not just about shipping practices, but about filament choice.

PLA: The Hobbyist’s Go-To… With Limits

Polylactic Acid (PLA) is the most popular 3D printing filament for a reason. It’s affordable, easy to print, doesn’t require a heated enclosure, and produces clean results. But its low melting point—typically around 60°C (140°F) for deformation—makes it vulnerable to heat. Add in its poor UV resistance, and PLA becomes a poor candidate for outdoor use or for anything exposed to sustained warmth.

Inside your home? Great. Inside a 120°F delivery truck? Not so much.

Beyond PLA: PETG, ABS, ASA, and the Heat Factor

After my warped delivery, I revisited my options.

The second most popular hobbyist filament is PETG (Polyethylene Terephthalate Glycol). It’s UV resistant, more flexible than PLA (so it bends rather than cracks under stress), and handles heat better—around 80–90°C before deforming. It prints slightly trickier than PLA, but the trade-off in durability is often worth it.

Then there’s ABS (Acrylonitrile Butadiene Styrene), a tough industrial plastic used in everything from LEGOs to car parts. It’s stronger, more heat-resistant, and widely used in commercial applications—but it releases fumes during printing and is prone to warping unless you use an enclosed printer.

ASA (Acrylonitrile Styrene Acrylate) is a newer alternative to ABS. It prints similarly, offers excellent UV resistance, and warps less, but it’s still more demanding than PLA or PETG and also benefits from an enclosure.

Each filament comes with trade-offs in cost, print difficulty, strength, and environmental resistance. Choosing the right one depends entirely on the intended use case.

Lesson Learned: Match the Filament to the Real World

That warped item taught me a simple but critical lesson: print for the conditions the object will face, not just for ease of printing. PLA is still great—for objects that stay indoors, out of direct sun, and away from heat. (I’m literally typing this on a keyboard inside a PLA-printed case.)

But if you’re shipping something across the country in August, or building something that lives outdoors, it’s time to consider PETG, ASA, or another more rugged alternative.

I’ll still use PLA—it’s too convenient to ignore and offers much more color variety. But for prints that leave the comfort of climate control, I’m rethinking my defaults.

Because a warped print isn’t just frustrating—it’s a waste of time, material, and the chance to make something truly useful.

Published on August 26, 2025
Full Post
0 Responses

“The Best Self-Hosted Photo Solution in 2025? Why I Chose Immich

I am a big believer in the concept of multiple redundant backups. And few things are more important than memories and the family photos. I have built a NAS and have been keeping my important files on it, with the files backed up in two other locations. However, I had not done that for my photos. I have them in multiple locations, but I am paying for hosting.

One of my solutions is free…in a way. I back up to Amazon Photos, as it is included with Amazon Prime. However, so was Prime Video until they added ads, so it is not a guarantee this will continue and I never use it to retrieve photos, just as an extra location. The most popular photo sharing and storage site is probably Google Photos right now, though there are plenty of alternatives. I have stuff there as well.

I needed a place under my control to organize and share my photos, not just a disorganized archive. It was time to migrate to a less expensive self hosted solution, backed by my NAS for storage. Then I could incorporate my existing multi location backup system to keep the files safe.

Immich

I had heard a lot about different self hosted solutions, but the most popular one I keep hearing about of late is Immich. Immich is in beta, but it is meant to reach stable this year. It already seems to be extremely stable, but it warns that you should have a backup strategy outside of it, as it is not meant to be a backup strategy by itself. I already have one, once I include this in the pipeline.

immich screenshot
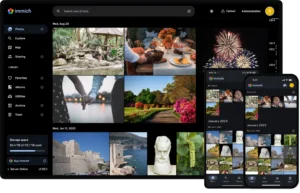
Immich is a full fledged system for photo sharing and organization. It supports showing photos on a map, face and object recognition, and more. I can easily share photos with expiring links or ones that will last forever. There is an API I can use to integrate with other systems.

While there are alternatives, such as Photoprism, Immich has a familiar design language, modern features, and offers a mobile app which can automatically backup your photos into Immich.

Please remember, if you simply upload to Immich, or any service, and purge all other copies, that isn’t a backup.

Published on August 25, 2025
Full Post
0 Responses

Using QMK to Maximize Smaller Keyboards

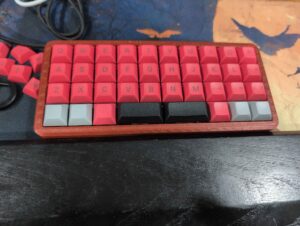
As I have continued my keyboard journey, my keyboards have gotten smaller and smaller. While many people use forty percent keyboards as their daily drivers, there are some who use them for when portability is a must. I am writing this on one of those keyboards.

The most common way to allow for smaller keyboards would be layers. Layers are second keymaps triggered usually by holding down a key. Your keyboard may have that as a Fn key. I continue to try to tweak my layers on various keyboards, and looking to optimize my typing. But I had not really conceptualized how to use some of the other features that QMK, the most popular open source keyboard firmware, supports.

I recently turned to two other QMK features: Tap Dance and Combos.

  • Tap Dance is a feature that allows you to set different keys based on tap, double tap, or hold.
  • Combos allow two or more keys to produce a key output

The keyboard above is the Acai PCB in a 3d printed case. I built this from components and typed this post on it. The Acai is a 4×10 ortholinear keyboard. The bottom row is customizable with a variety of different spacebar lengths from a single key to the full width of the board.

I have spent a fair amount of time with 4×12 ortholinear boards, like the popular Planck. The extra two columns allow for modifiers along the sides, depending on how you configure the keys. Modifiers would be things like Ctrl, Enter, Shift, and so on. If you look at the Acai, there is no room to the left and right of the alphas(letters) for that. The only modifiers would have to be places on the bottom row in most configurations.

Until recently, I had solved this mostly with layers. I would press a key and that would remap the other rows. But this meant for some keys, I needed to press a key on the bottom row and one on far from it on the board, which is not always ideal configuration wise.

Scrolling through advice one day, I was reminded of combos. With them, instead of holding a layer key, two keys could produce what I wanted…so I started with their suggestions.

  • P and O, occupying the space a backspace key might, when pressed together produce a backspace
  • A and S generate a TAB
  • Q and W an ESCape

This worked more efficiently for me and I experimented with a few more. With customizable firmware like QMK, or QMK firmware with Vial compiled in, which allows you to play with these things in real time without having to recompile, the limit is memory capacity and your imagination.

For Tap Dance, I have made holding down the T key scroll up, and B down. The challenge for tap dance is when you are typing a word with the same letter in a row, like the word letter. If you don’t retrain yourself, you’ll trigger your secondary key. I recently traded something for a Ploopy Nano, which is a tiny trackball, which has no buttons. With tap dance, I can make a key combination be my mouse, allowing for an even smaller setup.

There are many reasons to try an ortholinear keyboard, or a forty percent keyboard. However, the fact you can can carry around an even smaller keyboard when on the go is not usually one people think about. With these features and a little practice, you can have your own tiny keyboard that suits your needs.


Published on August 22, 2025
Full Post
0 Responses

Tasmota vs ESPHome: Why I am Migrating to ESPHome to Increase Control

I have been running smart light switches for a while, and using the Tasmota firmware on them. Let’s be clear, Tasmota is a great piece of software. It’s reliable, open-source, packed with features, and in many cases, works right out of the box.

But over time, I found myself chafing at the limits.

Tasmota, for all its strength, is kind of like a Swiss Army knife. It is not always the most efficient or most effective for your needs. You either need to use its limited syntax, or rely on external systems.

So, recently I’ve been migrating a lot of my lights and plugs over to ESPHome. a platform I was already using for sensors.

Why I’m Moving to ESPHome

ESPHome is more modular and streamlined than Tasmota. You don’t flash a generic firmware – you compile a custom one. The configuration of the device is set in YAML, a text format, you define exactly what the device needs. What sensors or relays are connected, how buttons behave, what actions they trigger, and more.

  • Want a web interface? That’s a component.
  • Need to calculate sunrise and sunset for dawn/dusk functionality?
  • Need to sync to an NTP time server for that dawn/dusk?
  • Want two ESPHome devices to talk to each other independently?
  • Track bluetooth devices?
  • Communicate over a VPN?

There are components for all of these. I was able to fine-tune the behavior of each smart switch and plug, beyond what I could do in Tasmota. I installed dawn to dusk programs on external lights. I tied a light into a remote motion sensor, also running ESPHome to activate a hallway light. I even built countdown switches that automatically turn off after a set period of time.

Local Control

One of the major advantages of Home Assistant is local control. Both Tasmota and ESPHome allow for some logic on device, but with Tasmota that logic is very limited. You don’t have to rely on Home Assistant or Node Red to create automations.

That said, not all logic belongs on-device. I don’t use ESPHome for high-level automation or multi-device coordination. That’s where Home Assistant or even Node Red still shines. But for device-specific behaviors—like button presses, countdown timers, or dusk/dawn triggers – having that logic on the device itself makes the whole system more resilient. No lag, no missed automations if those systems are offline.

Final Thoughts

Switching from Tasmota to ESPHome takes time. There’s a learning curve to create the configuration files. But once you get the hang of it, the freedom to define exactly how your smart devices behave is game changing.

If you are looking for something to install on your first switch, Tasmota is still a great place to start. But if you reach the limits of what you can do with it, it might be time to switch over to ESPHome. Some things take effort, but by with that effort you can build a smart home where every piece is smart on your terms.

Published on August 20, 2025
Full Post
0 Responses

Can DIY Solar Panels Eclipse My High Energy Bills?


The Solar Panels Experiment: My Journey Toward Energy Self-Sufficiency

DIY Modular Solar

I’ve always been a tech optimist. If there’s a gadget or piece of infrastructure that promises to make life more efficient, more automated, or more independent, I want to understand it—and if it works, adopt it. That mindset is what originally led me to install sensors throughout my vacation property, experiment with remote home monitoring, and try out new smart home technologies as they’ve emerged. It’s also what led me to install heat pumps at the house.

But this year, optimism turned into skepticism.

When Promises Meet Reality: My Heat Pump Debacle

Like many homeowners looking for a greener, more modern solution to heating and cooling, I was lured by the promise of heat pumps. No more oil or propane deliveries. Whisper-quiet operation. Environmentally friendlier systems. Substantial government and utility rebates. It all sounded like a win-win. And for a while, it was.

Then the winter utility bills started rolling in.

And they kept rolling in.

What had once been a manageable heating bill tripled, year over year. And the culprit, according to my utility provider? “Usage.” Allegedly, I had used nearly three times the energy I had the previous winter, despite no notable changes to my use of the property or the weather.

I chalked it up to a few possibilities—yes, heat pumps use electricity rather than combustion fuels, and in very cold climates, they can struggle to operate efficiently. But the scale of the increase was baffling. It didn’t align with reality. And then I remembered something else: around the same time the heat pumps went in, my utility provider installed smart meters.

Smart Meter, Dumb Results?

Now, I want to be clear—I’m not a conspiracy theorist. I don’t think there’s a cabal of utility engineers huddled around a dial cranking up my bill to fund their quarterly bonuses. But I am a technologist, and I know that technology—particularly rushed, wide-scale deployments—can be flawed. Especially when there’s no customer-side auditability.

There’s something uniquely frustrating about seeing a bill that’s three times higher than it used to be, accompanied by usage data you have no way to independently verify. The old meters spun. You could watch them. Smart meters? They hum silently in the background, collecting data and sending it off somewhere. You have to trust that they’re correct.

I don’t.

And that brings me to the reason for this article—and for what I hope will be an occasional series here on GadgetWisdom: my exploration into solar.

The DIY Solar Panels Experiment Begins

Let me be clear: I am not making a massive investment in solar overnight. This isn’t a sponsored, all-in, “I just installed a 20kW Tesla roof and Powerwall system” kind of post. This is a cautious experiment. It’s a project. And like many of you reading this, it starts with a desire to understand—really understand—how something works, and what kind of value it can provide.

My goals are as follows:

  1. Buy and install a small solar setup: I want to start with a small number of panels and a basic grid-tied inverter system. Nothing fancy. No batteries (yet). Just enough to monitor output, offset a bit of consumption, and see how it integrates with my existing power setup.
  2. Ensure expandability: Any system I install now must be modular. That means using microinverters or a hybrid inverter setup that allows me to add more panels in the future without ripping everything out. It also means laying the groundwork—electrically and logistically—for future energy storage.
  3. Monitor performance obsessively: I want to track production vs. usage as granularly as possible. This means smart monitoring systems, independent usage logging, and some good old data nerding.
  4. Build toward self-sufficiency: Over time, the goal is to generate enough power to offset a significant portion of my usage—especially in winter. That might mean batteries, backup systems, or even some creative load management.
  5. Document the process for others: Solar is full of hype and half-truths, and I want to provide something a little more grounded. Real-world data. Real-world frustrations. Real-world results.

The Challenges Ahead

Going solar sounds simple in the abstract: slap some panels on your roof, plug them in, and start saving. But in practice, it’s more complicated. Some of the challenges I’m already anticipating:

  • Shading: My property is surrounded by trees. Not directly overhead, but enough that seasonal shading may affect panel output. I’ll need to map this out carefully and possibly look at ground mounts or pole mounts.
  • Installer cooperation: Many solar installers aren’t thrilled about small, modular installs. They want to do big 10kW+ systems, not 1kW proof-of-concept setups. They also make their money from financing and tax credits, making pricing as opaque as possible. So my plan is to use my trusted roofer and electrician to do the work.
  • Utility cooperation: Getting a grid-tied system approved and interconnected with my local utility can be a bureaucratic maze. Add to that my lingering skepticism of their smart meter data, and you can imagine how thrilled I am to begin that process.
  • Rebates and tax credits: There are local and federal incentives for solar, but they vary wildly and can change year to year. I’ll need to track them closely to make sure I maximize returns without getting buried in paperwork. Many of these may be going away next year thanks to President Trump’s Big Beautiful Bill
  • Batteries… eventually: Energy storage is expensive and complex. But it’s the key to resilience and off-grid capability. That will be a future phase of the project—probably next year if this first stage goes well.

Why Start Small?

Some people go big on solar because they’ve run the numbers and are convinced of the return. I’m starting small for the opposite reason: I don’t trust the numbers I’m seeing, either from installers or from my utility. I want to build my own dataset, see how panels perform in my exact conditions, and make decisions based on real data.

Plus, the tech changes fast. Inverters get smarter, panels get more efficient, and storage options evolve. By starting small, I give myself the flexibility to adopt the best solutions over time instead of locking into something big—and potentially obsolete—right now.

What You Can Expect

In future articles, I’ll be covering:

  • My research process for selecting panels and inverters
  • Tools and apps for tracking solar production
  • Permitting and interconnection headaches (hopefully not too many)
  • Installation decisions: roof vs. ground, angle, orientation
  • Performance analysis: how much power am I really generating?
  • Integration with my existing smart home and monitoring setups
  • First steps toward energy storage and load shifting
  • And eventually—what it all costs, what it saves, and whether I’d do it again

This won’t be a rapid journey. I’ll be documenting things as they happen—warts and all. If you’re a fellow DIY enthusiast, off-grid dreamer, or just someone who’s tired of paying power bills you don’t trust, I hope you’ll follow along.

Why This Matters

For me, this isn’t just about saving money (although I’d like to). It’s about taking control. It’s about not being at the mercy of a utility company whose math doesn’t add up. It’s about learning how to be more self-sufficient. And yes, it’s about the joy of tinkering—of building a system, testing it, improving it.

GadgetWisdom has always been about that impulse: to explore, to question, and to build. This solar journey is a natural extension of that spirit.

So let’s get started. Next up: choosing my first panels and inverter.

Stay tuned.

Published on August 18, 2025
Full Post

Get New Posts By Email